
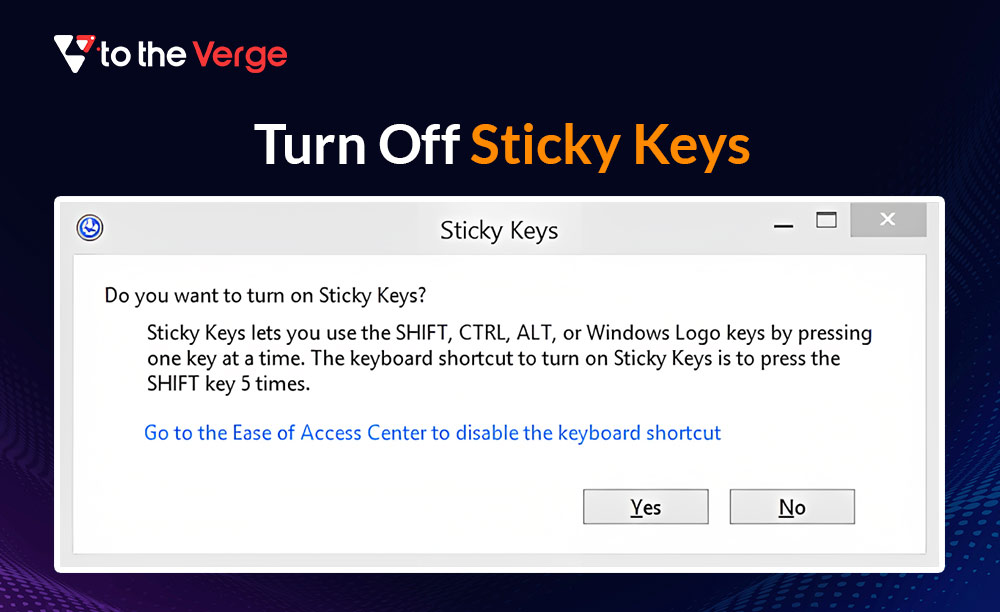
Windows PCs are well-known for their simplicity, yet even this highly user-friendly computer operating system may be uncomfortable at times. One such instance is when the “sticky key” notification appears every time you repeatedly press a keyboard button.
If you’ve ever used a Windows PC and noticed the Sticky Keys notification appear every time you repeatedly press a keyboard button, you know how frustrating it can be. This is particularly true when you utilize modifier keys such as Shift and Ctrl while playing games or dealing with complex software.
This notice shows that the Sticky Keys function has been enabled, which can be troublesome if you don’t know how to disable it. Thankfully, there are a few easy steps you can take to turn off the Sticky Keys function and remove the bothersome notification. If you do not know how to turn off Sticky Keys on Windows 10/11. Don’t worry! If you follow the instructions given in this post, the Sticky Keys notification will not show up every time you press a keyboard button.
The Sticky Keys message is merely a minor annoyance. And as Windows PCs are known for their user-friendly interface, do not let that prevent you from using them. Simply adhere to these simple instructions on how to turn off sticky keys in Windows 11/10. And you will soon be able to use your computer without getting frustrated!
What are Sticky Keys on Windows PCs?
The Sticky Keys functionality on Windows systems enables users to input keyboard shortcuts by pushing keys one at a time rather than all at once. Instead of pressing Ctrl, Alt, and Del at the same time, a user may press Ctrl, Alt, and Del in that order. This might be advantageous for people who have restricted mobility or use of their fingers.
To activate it, you must repeatedly press the Shift key five times in the default configuration. However, this occurs frequently when using a computer for tasks like document processing or gaming. Because of this, users frequently have to stop what they are doing to respond to the Sticky Keys message.
If you’re one of those people who is looking for how to remove Sticky Keys in Windows 10/11. Don’t worry! There is an easy fix for this problem. You can quickly disable Sticky Keys in Windows by simply following the steps on how to unlock Sticky Keys below:
How To Turn Off Sticky Keys Via Keyboard Shortcut
The easiest method for deactivating sticky keys is to use the same keyboard shortcut that activates them, which is five presses of the Shift key. Alternatively, you can simultaneously press the Ctrl, Alt, Shift, or Windows keys while pressing two function keys. Although it will not stop the issue from occurring again, this will immediately resolve your issue. This is a simple solution if you are looking for a shortcut to how to turn off Sticky keys.
Also Know: How to Fix Keyboard Keys Typing Wrong Characters in Windows
How To Turn Off Sticky Keys Through the Settings Tab
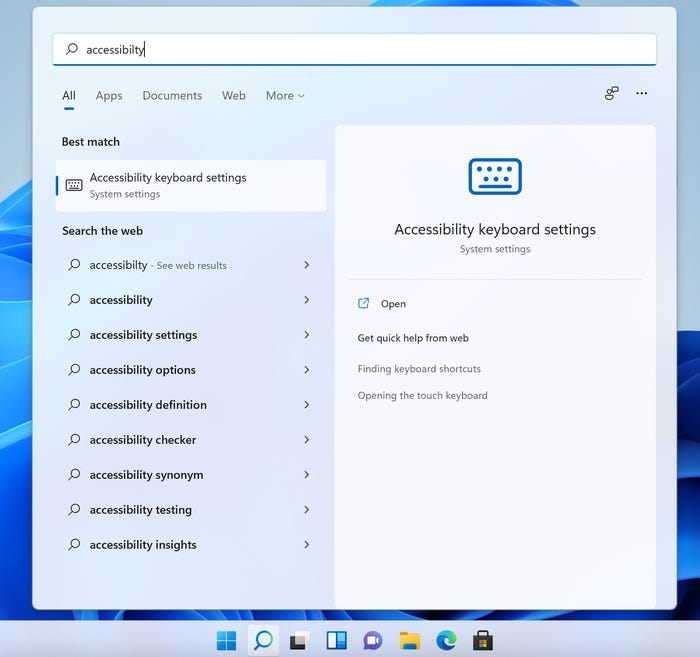
If you’re running Windows 10 or 11 and want to know how to remove Sticky Keys, you’re able to turn on or off Sticky Keys through the settings tab. Let us begin by figuring out how to turn off Sticky Keys in Windows 11:
- Click the Windows icon in the Taskbar or press the key with a Windows logo.
- Look for the Accessibility option.
- In the list of search results, click on Accessibility keyboard settings.
- Set the switch beside Sticky Keys to Off.
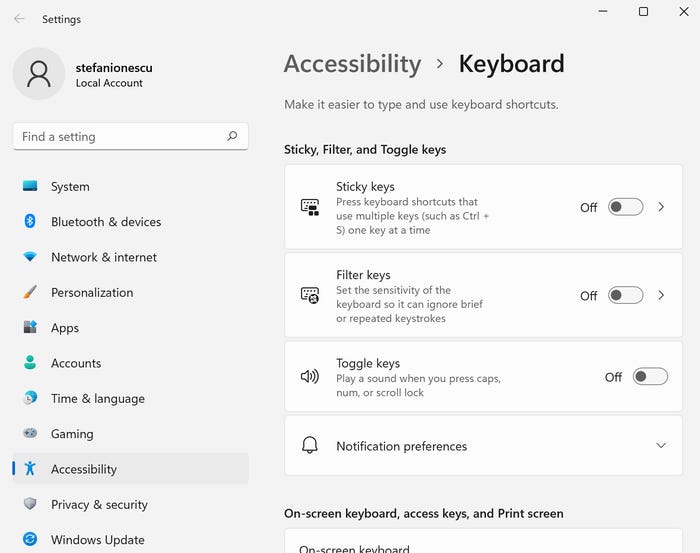
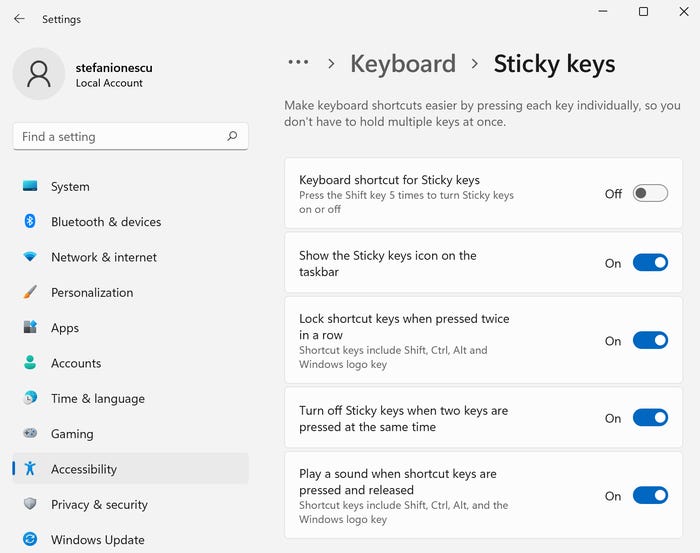
- Click Sticky Keys and switch to the Off position next to the keyboard shortcut that corresponds to Sticky Keys. This will make the shortcut inactive.
Also Know: How to Update and Reinstall Keyboard Drivers on Windows 10/11
How To Turn Off Sticky Keys In Windows 10:
If you are looking for a solution on how to turn off Sticky Keys on Windows 10, simply follow the steps below:
- Click the Windows icon in the Taskbar or press the key with a Windows logo, which can be found in the lower-left corner of your screen.
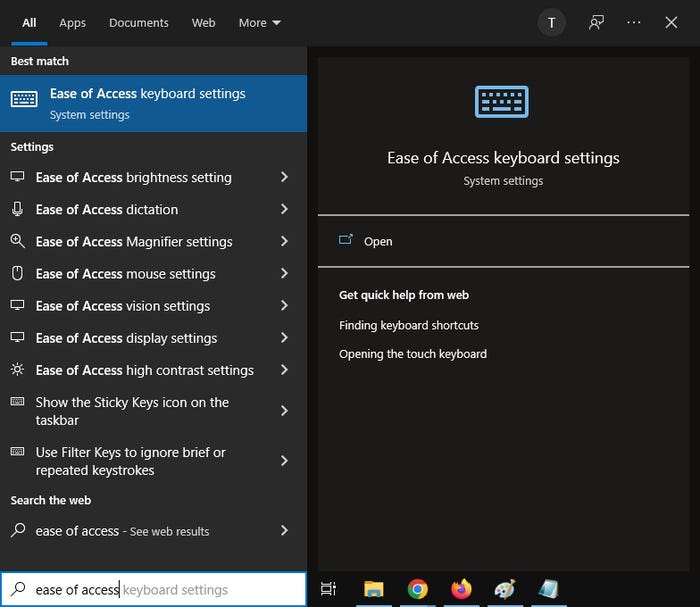
- Look up the Ease of Access option.
- From the search results, choose Ease of Access keyboard settings.
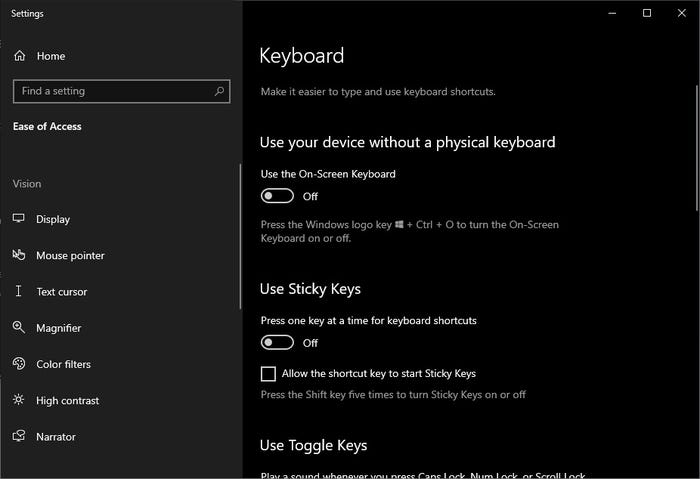
- Set the toggle next to Use Sticky Keys to Off. You can deactivate the shortcut so that it will not be reactivated by deselecting Allow the shortcut key to start Sticky Keys.
Also know: How to Fix Backspace Not Working in Windows PC
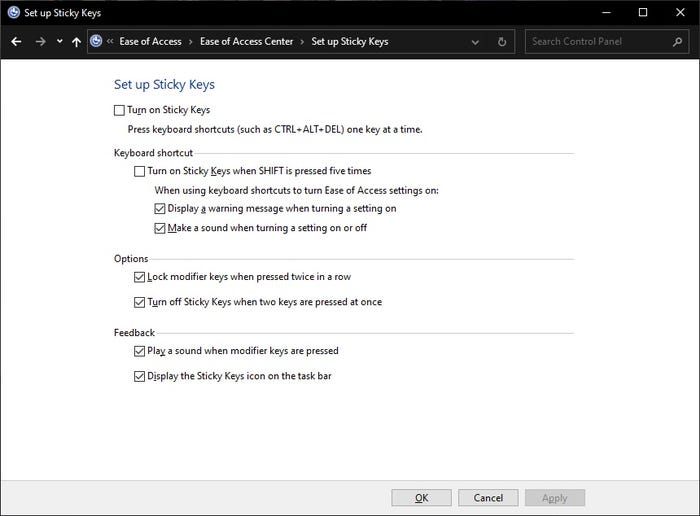
How To Turn Off Sticky Keys Through the Control Panel
If you are running Windows 7 or 8, or any other operating system. And if you want to know how to turn off sticky keys on Windows PCs, follow the instructions below.
- Click the Windows icon in the Taskbar or press the key with a Windows logo on it.
- Click Control Panel to launch it.
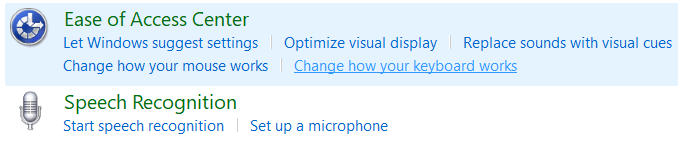
- Select Ease of Access.
- Select Change how your keyboard works from the Ease of Access Center.
- Uncheck the box next to Turn on Sticky Keys in the Make it easier to Type section.
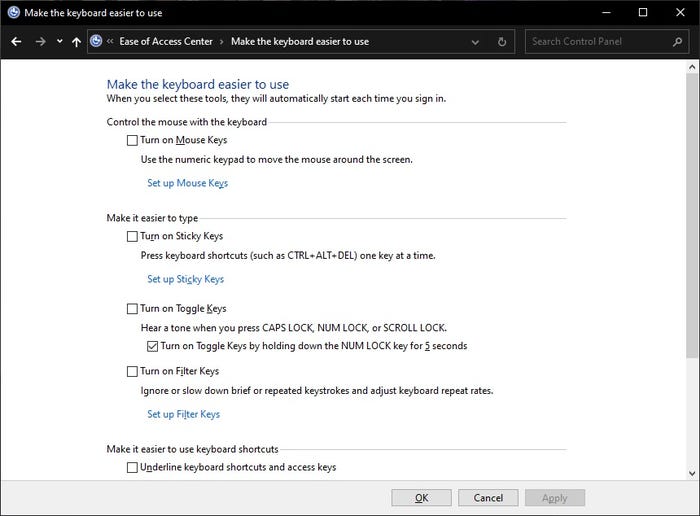
- To turn off the shortcut, select Set up Sticky Keys and uncheck the box next to Turn on Sticky Keys when SHIFT is pressed five times.
Also know: Number Keys Not Working on Windows 10? Here’s How To Fix It
Solved: How to Turn Off Sticky Keys on Windows 11/10
Sticky Keys can be beneficial to those who find it difficult to press two keys at once. However, it is simple to disable it using the Control Panel or Windows settings. So, if you’re looking for a solution to how to turn off sticky keys on Windows 10, Windows 11, or an older system like Windows 8 and 7. You don’t have to worry. By applying the methods mentioned above, you can easily turn off Sticky Keys. And you can resume your computer-related tasks without feeling frustrated. We hope that this article was helpful in explaining to you how to remove Sticky Keys and regain control of your keyboard!
Snehil Masih is a professional technical writer. He is passionate about new & emerging technology and he keeps abreast with the latest technology trends. When not writing, Snehil is likely to be found listening to music, painting, traveling, or simply excavating into his favourite cuisines.


![How to Update and Reinstall Keyboard Drivers on Windows 10/11 [A Guide]](https://wpcontent.totheverge.com/totheverge/wp-content/uploads/2023/06/05062841/How-to-Update-and-Re-install-Keyyboard-Drivers-on-Windows-10.jpg)
