
Have you been encountering difficulty where your Windows Spotlight is not working in Windows 11? This can be extremely frustrating since Windows Spotlight provides you with an excellent way to customize your device with appealing images and helpful information. However, don’t worry, as there are a number of solutions that you can try to resolve the Windows 11 Spotlight not working issue.
Ever wondered how those incredible images got onto your Windows 11 login or lock screen? All thanks to the Windows Spotlight function! Every day, it automatically updates your screen with beautiful images from Bing as well as interesting facts and helpful hints. Its main goal is to give users a customized and aesthetically pleasing experience by automatically downloading beautiful wallpaper from Bing and displaying it on the Windows Lock screen.
This dynamic wallpaper rotation gives the user interface a little more vibrancy and variety. Nevertheless, despite the fact that the Windows Spotlight feature has many advantages, some users who have upgraded from the previous Windows 10 platform to Windows 11 have experienced Windows 11 lock screen spotlight not working problems.
They have specifically reported instances where their PCs or laptops’ Windows Spotlight images are not changing as expected. It can be extremely upsetting if the most exciting feature on your Windows 11 PC does not work. But do not worry. There are several fixes you can try to fix the Windows Spotlight not working in Windows 11 problem. So dive in.
How to Fix Windows Spotlight Not Working in Windows 11
Are you experiencing problems with Windows Spotlight not working on a Windows 11 device? Don’t worry. In this comprehensive troubleshooting guide, we have compiled a collection of effective solutions to address the issue of the Windows 11 lock screen spotlight not working.
1. Ensure That Your Internet Connection Is Active.
First, make sure your device is online and that you have the most recent version of Windows 11 installed. The images that appear on the lock screen are downloaded every day from Bing. Therefore, if your network connection is slow, you might see the same image for the duration of your device’s use. Make sure you have a quick and reliable internet connection available if you want to fix the Windows 11 Spotlight Not Working issue. If the problem persists, proceed to the next method.
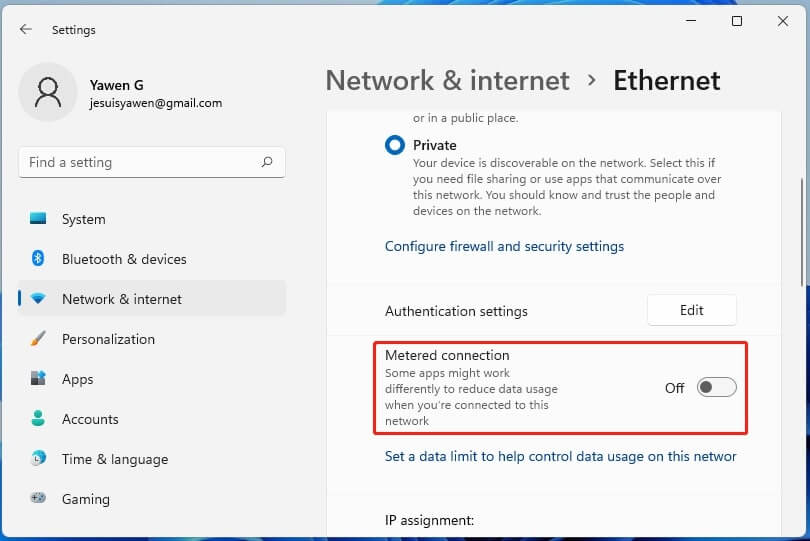
2. Disable the Metered Connection
After retrieving new images from Bing, Windows Spotlight updates the lock screen picture. This procedure also needs unrestricted internet access because it runs in the background. If the “metered connection” feature is turned on when using the internet, it will restrict the amount of data you use in the background. As a result, because it is unable to download new images, the Windows Spotlight images are not working on a lock screen.
Therefore, be sure to turn off metered connection settings on your Windows computer. To do so, follow these steps:
- Open the Settings window by pressing the Win + I keys, then select Network & Internet.
- Select a network connection, like Ethernet, in the right pane.
- Disable the toggle adjacent to Set as metered connection. Once that’s done, restart the machine to apply the changes, and then check to see if the Windows Spotlight not working in Windows 11 issue is fixed.
Also Know: How to Fix Windows 11 Widgets Not Working on PC?
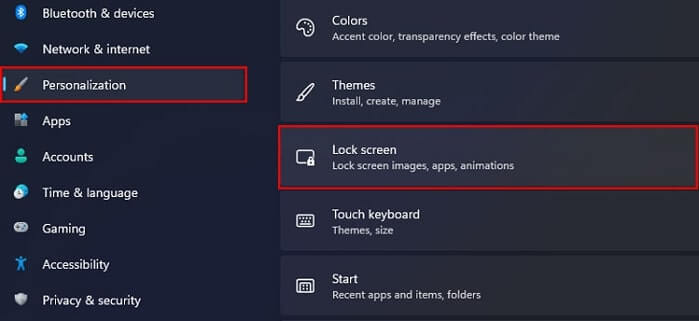
3. Reset Windows Spotlight
If the above step does not solve the issue, you can try resetting the Windows Spotlight feature. Occasionally, a black image will appear in place of wallpaper if the lock screen type is set to Windows Spotlight. This is common when the Spotlight service is malfunctioning. The best way to resolve the Windows 11 lock screen spotlight not working problem is to reset Windows Spotlight. To do this, follow these instructions:
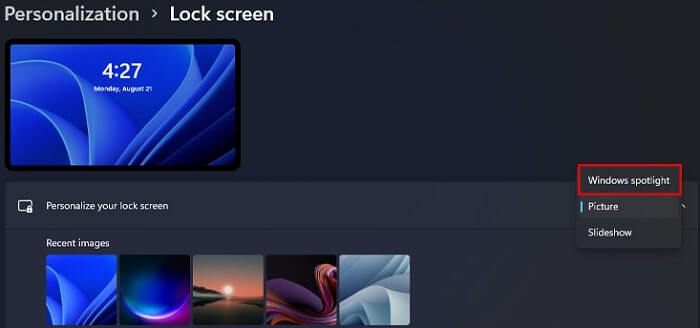
- Navigate to the Settings menu.
- Click on Personalization.
- Select Lock Screen.
- Under the “Background” drop-down menu, choose “Picture” instead of “Windows Spotlight”.
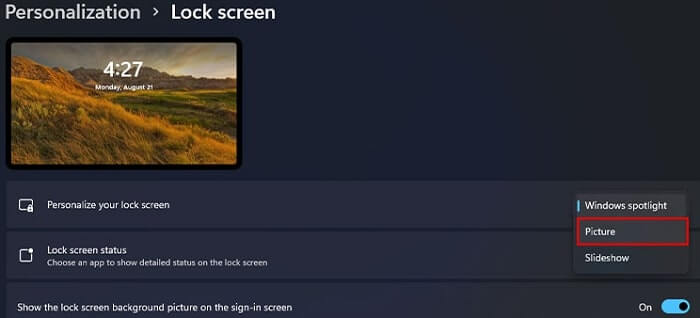
- After this, restart your device and return to the lock screen settings. This time, select “Windows Spotlight” as your background. This should reset the feature and resolve the Windows Spotlight images not changing problem that you are facing.
4. Delete Spotlight Cache
A corrupted Spotlight cache may occasionally be the root of the Windows 11 Spotlight not working issue. If that’s the case, you can try clearing the cache for Windows Spotlight. To do this, follow the instructions below:
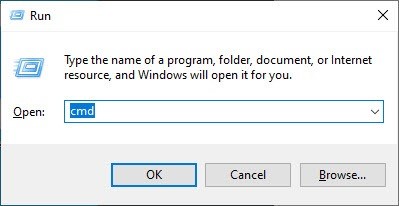
- Press Win + R to launch the Run dialog box, then type cmd into it and press Ctrl + Shift + Enter to launch the Command Prompt window. When the UAC window appears, select Yes.
- Type the commands that follow into the window that appears in the correct order, pressing Enter after each command.
- DEL /F /S /Q /A “%USERPROFILE%/AppDataLocalPackagesMicrosoft.Windows.ContentDeliveryManager_cw5n1h2txyewyLocalStateAssets”
- DEL /F /S /Q /A “%USERPROFILE%/AppDataLocalPackagesMicrosoft.Windows.ContentDeliveryManager_cw5n1h2txyewySettings”

Restart your computer after finishing the steps above and see if the Windows Spotlight not working in Windows 11 issue has been resolved.
Also Know: Windows 10 Taskbar Not Working? Here’s How To Fix It
5. Use PowerShell to Re-register Spotlight.
You can also use PowerShell to re-register Spotlight. It will force Windows to turn on Windows Spotlight, which may resolve the Windows Spotlight not working problem. However, before proceeding, make Windows Spotlight the background for the lock screen by selecting this option:
- Navigate to the Settings menu.
- Click on Personalization.
- Select Lock Screen. (You will get an error if you do not enable Windows Spotlight.)
- Type PowerShell into Windows Search (Win + S).
- Right-click Windows PowerShell and choose Run as Administrator.
- Now type the following command and press Enter.
Get-AppxPackage -allusers *ContentDeliveryManager* | foreach {Add-AppxPackage “$($_.InstallLocation)\appxmanifest.xml” -DisableDevelopmentMode -register } - Allow the command to run, and then restart the PC.
Finally, check to see if this has helped you resolve the Windows 11 spotlight not working problem.
6. Adjust Your Time and Date
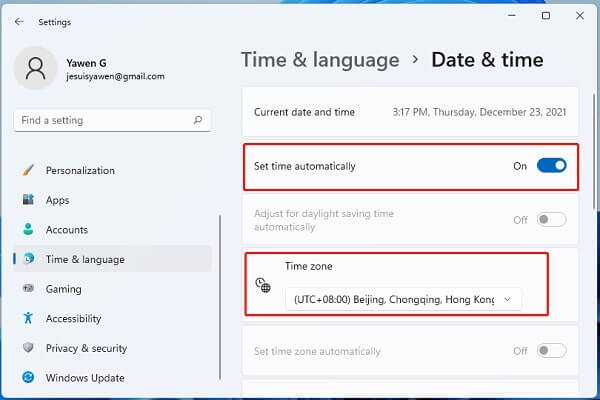
You might experience the Spotlight not working problem if you haven’t set the date and time correctly. Change your time and date by following the steps listed below.
- To change the date and time, simply right-click the settings in the right bottom corner and choose Adjust date and time.
- From the right pane, activate the button that says “Set time automatically,” then choose the date and time that you want to set in the Time Zone section.
- Check that you have the Country or region set correctly in the Language & region section.
7. Troubleshoot System Maintenance.
System Maintenance is a built-in troubleshooter available in Windows. As the name implies, it helps your computer run the maintenance procedure automatically. This is a simple technique for finding and fixing problems with your PC.
Follow these steps to run the troubleshooter:
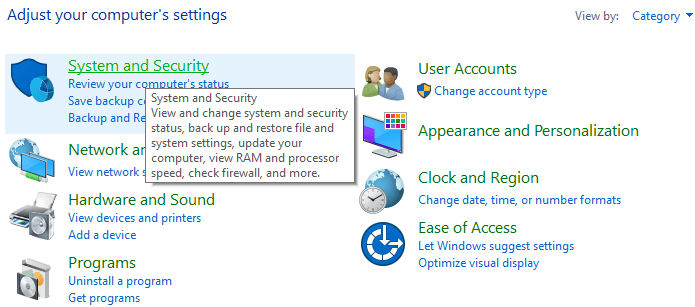
- To begin, select the Control Panel by pressing Windows key + X.
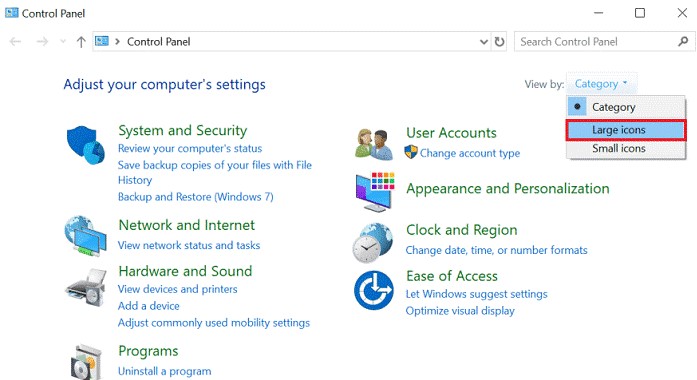
- Select View by: Large icons when the window appears.
- After that, select Troubleshooting by scrolling down.
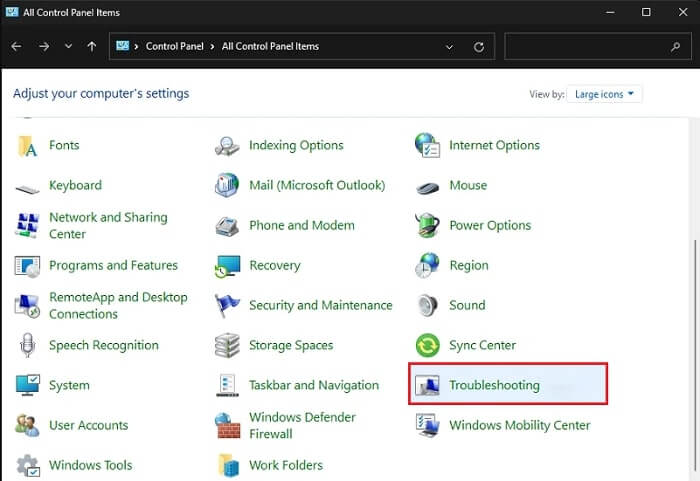
- Choose System and Security from the following screen.
- Now select System Maintenance.
- Then select Advanced.
- Select the box next to “Apply repairs automatically” and then click “Next.”
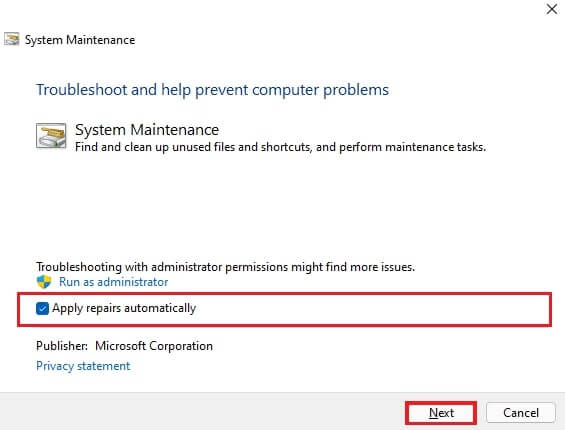
- If there are issues with administrator permissions, select the Try troubleshooting as an administrator option to find and fix them.
- The scan will now begin. Wait for the program to finish running and show the results. Then, to exit the troubleshooter, click the Close button.
Hopefully, this will fix the Windows Spotlight not working in Windows 11 issue. But if it keeps happening, move on to the next method.
Also Know: How To Fix Night Light Not Working On Windows 10/11
8. Execute the SFC Scan.
This method is for you if the Spotlight feature on your computer is not functioning because of damaged system files. Windows systems come with a tool called System File Checker (SFC) that helps you find and fix damaged files on your computer.
To implement this method, follow these steps:
- In the search field, click the Search taskbar icon and enter “cmd.”
- After that, select Open as administrator.
- When the prompt appears, enter the following command and press the Enter key:
sfc /scannow

From this point on, the process will be automatic. So simply wait until the scan is complete, then see if the Windows 11 Spotlight not working problem has been resolved.
9. Reset your PC
If nothing else works, you can simply reset your computer. It will be easier to test everything right away if you start from scratch, and Windows Spotlight should not have any issues running in conflict with any installed programs, drivers, or files on your computer. After ensuring that everything is operating as intended, you can use the backup you created to bring all of your data back.

How to Fix Windows Spotlight Not Working in Windows 11: Solved
Windows Spotlight not working can be a frustrating issue, but there are several solutions that you can try. We hope these solutions will help you resolve the issue and get Windows Spotlight working again on your Windows 11 device. Please feel free to leave any additional queries in the comments section below.
Snehil Masih is a professional technical writer. He is passionate about new & emerging technology and he keeps abreast with the latest technology trends. When not writing, Snehil is likely to be found listening to music, painting, traveling, or simply excavating into his favourite cuisines.


![How to Update and Reinstall Keyboard Drivers on Windows 10/11 [A Guide]](https://wpcontent.totheverge.com/totheverge/wp-content/uploads/2023/06/05062841/How-to-Update-and-Re-install-Keyyboard-Drivers-on-Windows-10.jpg)
