Do you want to organize the excessive number of photos you have accumulated on your Windows computer? Well, for that, the first thing that you need to do is find duplicate photos on your Windows 11/10 PC and remove them. Now, you may be curious as to why duplicate and identical images are so important in the modern era when you’ve got plenty of space on your devices today.
We all enjoy making and preserving memories, and taking pictures is a great way to do this. Modern technology has made taking pictures remarkably easy. So, in order to get that ideal frame, we wind up taking several photos that are duplicates or similar. Over time, duplicate images start to accumulate as a result of this behavior.
If you don’t organize your pictures (which most of us don’t), a substantial number of duplicates get created. Due to this, the computer’s ability to store and operate effectively gets restricted. Therefore, it’s essential that you find duplicate photos and remove them. However, a typical PC user might find the process of locating and eliminating duplicate images to be time-consuming and challenging.
But don’t worry. Here, you will discover some quick methods through which you can easily understand how to find duplicate photos on Windows 11/10 computers and easily get rid of them.
Manual Methods to Find Duplicate Photos
Here are some of the easiest methods to quickly find and remove duplicate photos on Windows 11/10 computers. Simply work your way down until you find the way that works best for you. There is no need to try them all. So, without further ado, let us begin:
Method 1: Find And Remove Duplicate Photos Using Microsoft Photos App
To organize your images, use the Microsoft Photos App, which is also referred to as Windows Photos or simply Photos. Microsoft Photos is a program for viewing and managing images that comes with Windows 11, 10, 8.1, and 8 as an alternative to Windows Photo Gallery.
To find duplicate photos for free using Microsoft Photos, you need to first disable the Linked Duplicates feature. To improve the photo browsing experience, the option to hide duplicate images is turned on by default. Please take note that the option does not eliminate duplicates. To turn off this feature, navigate to the Settings section of Microsoft Photos and switch the Linked duplicates toggle to Off.
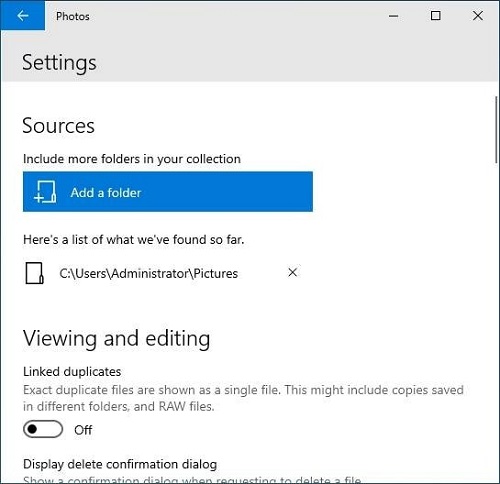
You may now begin to find duplicate photos without software on Windows 11/10, using the Photos app. Follow these steps to do so:
- Open the Microsoft Photos application.
- Select the Collection option.
- Look through your pictures and compare them to see if there are any duplicates.
- Click the Delete icon located in the upper-right corner of the window after selecting multiple redundant or duplicate photos.
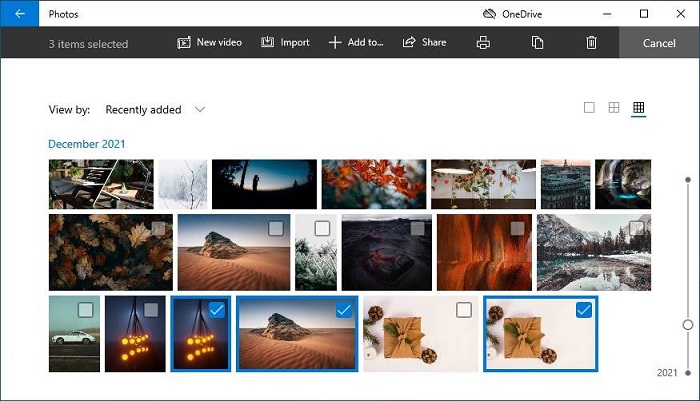
- To delete the selected duplicate pictures, click Delete in the dialog box that says “Delete these files.”
If this method didn’t work out for you, then you can go with the next effective method to find duplicate photos without software on Windows 11/10 computers.
Also Read: Best Photo Management Software in 2023
Method 2: Find Duplicate Photos on Windows 11/10 Using File Explorer
The Microsoft Windows operating system includes File Explorer, formerly known as Windows Explorer, as a file management tool for organizing duplicate photos. It lacks a feature to deal with duplicate photos. However, there are techniques that make deleting duplicate photos from a PC using File Explorer relatively simple. If you have a large collection of photos, the process might take some time. Here’s how to find duplicate photos without software on Windows 11/10 PCs.
- Launch File Explorer on your Windows desktop or laptop.
- To find duplicate photos for free and eliminate them, open the folder containing them, such as the Pictures folder.
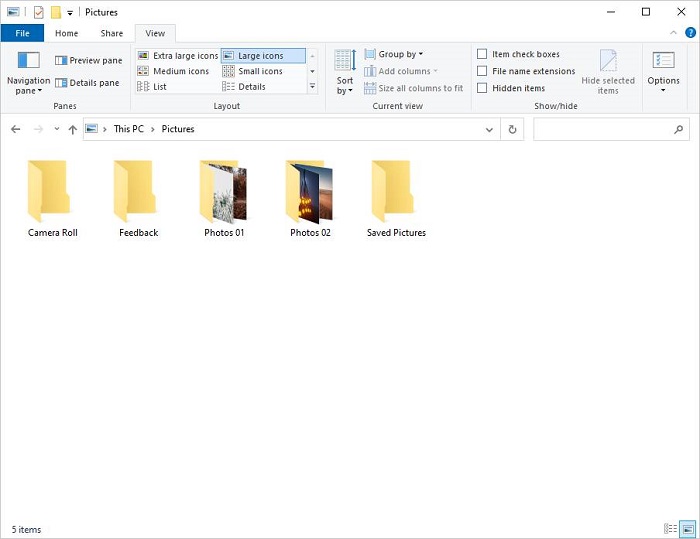
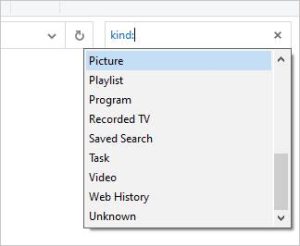
- If the folder contains subfolders, type “kind:” in the search box and select Picture from the list that appears. The entire collection of images, including those in subfolders, will be shown.
- Select Extra Large Icons or Large Icons under the View tab. Additionally, select the Details pane.
- Select Sort by Name or Size from the drop-down menu after clicking the Sort by button.
- Examine the sorted photos to find duplicates by contrasting the details and content of each image.
- Right-click on a number of unwanted duplicate photos and choose Delete.
Note: Here’s an additional technique! If you type “*copy*” in the search box, all of the files in the folder with the word “copy” in their file names will be displayed. This is a quick way to find copies of photos that were created by copying and pasting images.

This is another effective way to find duplicate photos without software. However, these manual methods are time-consuming and overwhelming, So you can take help from the automated method below.
Also Read: Best Free Photo Recovery Software to Recover Deleted Images
Find and Remove Duplicate Photos Using Quick Photo Finder (Automatically)
Using manual methods is a tedious and complex process to find duplicate photos on Windows 11/10 PCs. Because of this, PC users constantly search for an automated program to find duplicate photos. Quick Photo Finder is one of these applications. And as the name implies, the tool gives users an incredibly quick way to find and delete duplicate images in a given folder.
Quick Photo Finder offers more functionality than just finding duplicate images. With just one click, duplicate photos can also be removed using this software. Here are some additional features that this quick duplicate photo finder program provides to its users. In addition to removing duplicate images from your Windows computer.
Quick Photo Finder Features
Here are some of Quick Photo Finder’s standout features that enable users to find duplicate photos with software and delete them on Windows PCs.
- The software includes a number of editable filters to assist you in conducting a precise duplicate image search.
- It makes it incredibly simple to add images and folders. All you need to do is drag and drop the folders and images onto which you want to run the scan.
- By grouping the results, Quick Photo Finder makes it easier for you to evaluate the duplicates that it has found.
- The search algorithm to find duplicate photos with software and delete them is highly precise and sophisticated.
- The user-friendly interface of Quick Photo Finder is another admirable aspect. Using this program to find and remove duplicate photos does not require any formal training.
How to Find and Remove Duplicate Photos Using Quick Photo Finder
Here is a quick guide on how to use the Quick Photo Finder program to find duplicate photos on your Windows 11/10 computer and remove them.
- To use Quick Photo Finder, you first have to download and install it. Click the button below to do that.

- Run the Quick Photo Finder setup once it has been downloaded to your computer to begin the installation process. When you run it, all you need to do to complete a successful installation is follow the prompts on the screen.
- Afterward, start this duplicate photo cleaner program on your computer.
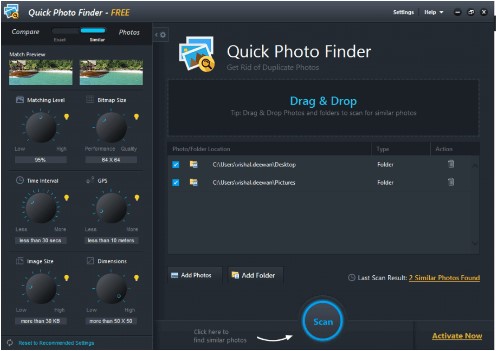
- After that, you have to add the folders that have duplicate photos. You can also drag and drop those specific folders to the scan pane for this purpose.
- Set the scan’s criteria now.
- Select the Scan option to find duplicate photos with software after setting the scanning criteria.
- You can review the list of duplicates and then proceed to delete duplicate files from your computer after reviewing it.
Also Read: How to Find and Remove Duplicate Files on External Hard Drive
Final Takeaway
This brings us to the end of our guide on how to find duplicate photos on Windows 11/10 PCs and delete them. Duplicate images should be regularly removed from your storage. It aids in maintaining the device’s functionality and freeing up the necessary space. But manually locating and deleting duplicate images seems like a desperate measure. On the other hand, Quick Photo Finder is a startlingly quick and efficient way to find duplicate photos with software.
Therefore, in our opinion, Quick Photo Finder is the best tool for finding and removing duplicate photos from a Windows 11/10 PC. Please feel free to get in touch with us if you have any further suggestions. To share your thoughts and feedback on the aforementioned post, use the comments section below.
Snehil Masih is a professional technical writer. He is passionate about new & emerging technology and he keeps abreast with the latest technology trends. When not writing, Snehil is likely to be found listening to music, painting, traveling, or simply excavating into his favourite cuisines.


![How to Update and Reinstall Keyboard Drivers on Windows 10/11 [A Guide]](https://wpcontent.totheverge.com/totheverge/wp-content/uploads/2023/06/05062841/How-to-Update-and-Re-install-Keyyboard-Drivers-on-Windows-10.jpg)
