
If you’re tired of your Windows 7 computer starting up slowly due to the accumulation of programs that run during startup, we’ve got you covered. In this article, we’ll guide you through the process of changing startup programs in Windows 7 to improve your computer’s performance.
Startup programs are applications that launch immediately after a system boot. For applications that you use frequently, this is a good practice. It saves you the time and effort of searching for those programs or, in some cases, manually installing them. That is precisely the reason why adding auto-start programs to Windows 7 computers makes sense.
However, many programs take advantage of the Windows startup process unnecessarily, consuming memory and resources and possibly impairing the performance of your computer. Additionally, some programs come pre-loaded with this feature when they are first installed. However, having too many auto-start programs in Windows 7 can make the boot process take longer. This has a negative impact, particularly on systems with limited capabilities or processing power.
The good news is that you have options to handle auto-start programs on your Windows 7 computer. This article will explain how to access startup apps, how to enable and disable startup apps, and how to add our preferred startup programs in Windows 7. Here’s how to deal with Windows 7 autostart programs.
How to Change Auto Start Programs in Windows 7
Do you want (or not want) a certain program to launch automatically when your Windows 7 computer boots up? It is surprisingly simple to change the Windows 7 autostart programs. This guide will show you the simplest methods to do so.
1. Change Windows 7 Autostart programs using System Configuration
We can quickly and easily audit what is running at startup using the Microsoft Configuration Tool (msconfig.exe) and disable anything we would rather start manually after booting. You can trust it because it was created by Microsoft. It is basically used to reconfigure your auto-start programs on Windows 7, Vista, or XP, among other things, so use caution when experimenting with it. If you follow the steps listed below, everything should work out.
Step 1: To start, click on the Start button and type “msconfig” in the search box. Hit enter or click on the msconfig.exe file that appears in the search results. This will launch the System Configuration window.
Step 2: Select the Startup tab in the System Configuration window. This will display a list of all the programs that are set to launch at system startup.
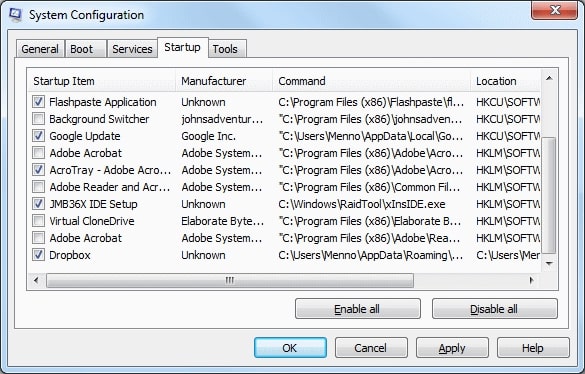
Step 3: To enable or disable a program from running at startup, simply uncheck to disable or check to enable the box next to its name. You can disable or enable as many Windows 7 auto-start programs as you want, but be careful not to disable any programs that are critical to your computer’s functioning. For example, you should not disable your antivirus software or any other security programs.
Step 4: Once you have disabled or enabled the programs you want, click on the Apply button, and then click OK. This will save your changes and close the System Configuration window.
Step 5: Finally, restart your computer for the changes to take effect.
Also Know: Best Free Driver Updaters for Windows PC in 2023
2. Change Windows 7 Autostart programs using Task Manager
Another way to change autostart programs on Windows 7 computers is to use Task Manager. For the Windows system, it serves as a monitoring tool. You can use it to manage every application and program that is currently running on your computer. Here is how you can use the Task Manager to manage the auto-start programs in Windows 7.
Step 1: Right-click on the taskbar and select Task Manager from the menu that appears.
Step 2: In the Task Manager window, click on the Startup tab. This will display a list of every program that is set to launch at system startup.
Step 3: To disable or enable any program, simply right-click on it and select Disable or Enable. Again, be careful not to disable any critical Windows 7 auto-start programs.
Also Know: Windows 10 Taskbar Not Working? Here’s How To Fix It
3. Change Auto Start Programs in Windows 7 from the Windows registry.
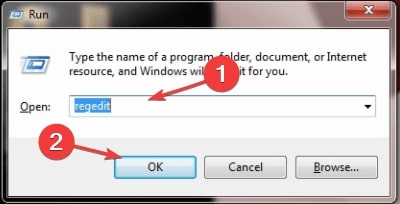
Step 1: To open the Run window, press Windows + R. Type Regedit into the box that appears, and then press ENTER.
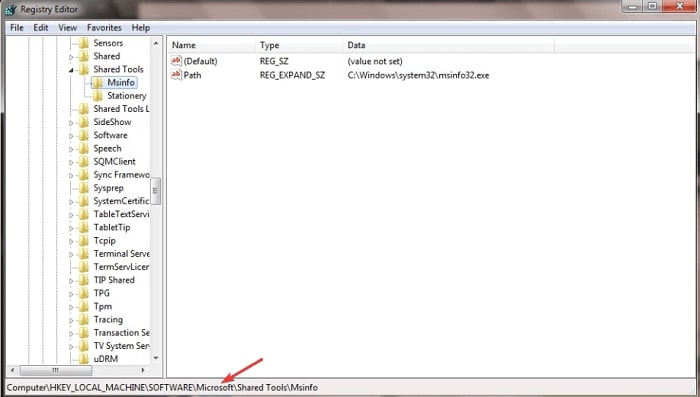
Step 2: Open the Registry Editor and go to the following location:
HKEY_LOCAL_MACHINE\SOFTWARE\Microsoft\SharedTools\MSConfig\startupreg
Step 3: Right-click on the startup program entry and choose Delete from the drop-down menu.
Step 4: Restart your computer to verify that the program starts up when you turn it on.
Delete the Windows 7 auto-start program from the startup registry folder to remove its startup option and prevent it from launching at startup.
Also Know: Best Free Registry Cleaner Software in 2023
Conclusion
Making an application a startup program is recommended if it is one that you always launch when your computer boots. When your system takes a long time to boot, it is most likely due to startup programs. Now that you know how to disable or remove Windows 7 auto-start programs, you don’t have to worry about the slow performance of your Windows 7 computer.
Disabling unnecessary programs from running at startup can significantly improve your computer’s performance. By following the above steps, you can easily change the autostart programs on your Windows 7 computer. Remember to only disable programs that are not critical to your computer’s functioning, and always restart your computer after making changes.
Snehil Masih is a professional technical writer. He is passionate about new & emerging technology and he keeps abreast with the latest technology trends. When not writing, Snehil is likely to be found listening to music, painting, traveling, or simply excavating into his favourite cuisines.


![How to Update and Reinstall Keyboard Drivers on Windows 10/11 [A Guide]](https://wpcontent.totheverge.com/totheverge/wp-content/uploads/2023/06/05062841/How-to-Update-and-Re-install-Keyyboard-Drivers-on-Windows-10.jpg)
