
If you’re dealing with poor sound quality or no audio while streaming your favorite music or watching your favorite TV show. Don’t worry! Simply follow the best fixes listed below to troubleshoot Realtek audio not working on Windows 10/11 or other audio problems.
Audio problems are a common occurrence for Windows users. Every time Windows updates, many users may experience audio-related problems. Users are left without sound due to this; if this sounds familiar to you and you are looking for solutions to the Realtek audio console not working issue, you are in the right place.
Although Windows 11 and 10 come with Realtek high-definition audio preinstalled, problems with Realtek audio still occur. In this article, we have provided the best ways to resolve the Realtek audio not working on Windows 11 or 10 issues and other Realtek audio problems.
It is important to understand the root cause of the sound issue before discussing a solution to the Realtek audio console not working issue. Understanding the root of the issue makes it simple to resolve.
Possible Reasons Why Realtek Audio Not Working
The reasons why Realtek audio stopped working on Windows 11 and Windows 10 are as follows.
- The Realtek audio driver is out of date
- The audio service on Windows is malfunctioning
- Active sound enhancement
- Problems with the current audio format
- Missing support for the Microsoft UAA Bus Driver
- Incorrect or improperly installed sound driver
- wrong output device
Above are some major reasons behind the Realtek Audio Not Working on Windows 10/11 issue. Let us talk about resolving these Realtek audio problems now.
How to Fix Realtek Audio Driver Not Working Problem
Whether you encounter audio issues following the most recent Windows update or driver uninstallation. To solve the problems with the Realtek audio driver not working on Windows 11/10, try the following fixes.
Solution 1: Check The Volume Levels as well as Muted Outputs.
Start by completing the simple fixes first. Ensure that you have not muted the audio setting if your machine fails to produce any sound. Check to ensure that the master volume bar isn’t mute or tuned to an excessively low volume by clicking the volume icon in the bottom-right corner of your computer. If the speaker is mute, a cross will appear next to the speaker symbol.
To view the current level of volume for each app playing audio, right-click on the volume icon and select Open Volume Mixer. If necessary, increase their volume while making sure they aren’t unintentionally mute or at an inaudible level.
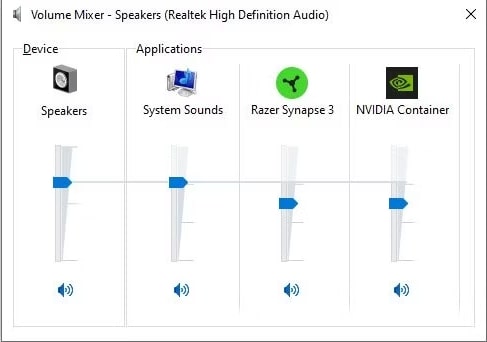
Check the volume of any running programs, games, media players, or the like as well. No matter how loudly Windows’ master and browser volume levels are set, a mute YouTube video won’t play any sound.
Also know: USB PnP Sound Device Drivers Download, Install and Update
Solution 2: Update Realtek High-Definition Audio on Windows 11 and 10
Out-of-date damaged, or missing drivers are the main causes of sound issues on Windows. To fix this issue, we recommend that you download and install the most recent driver. You have the option of doing this manually or through an automatic process.
To manually update the most recent driver, go to the website of the manufacturer that makes your sound card and search for the appropriate driver download. You must first gather details on the computer’s operating system version, the manufacturer and model number of your motherboard, or your audio card. Only after that can you install the appropriate driver.
Consider the fact that this appears to be an unnecessary amount of work or that you lack the technical expertise to gather all of this data. You can try using the Bit Driver Updater program in that situation. Without gathering information about your system or devices, this utility enables you to download and install compatible drivers. In addition to this, Bit Driver Updater also maintains a backup of outdated drivers for safety reasons.
You can download the Bit Driver Updater program by clicking the link below. The software immediately displays every out-of-date driver on the system after installation. You can choose the Update All option once every outdated driver is listed on the screen.
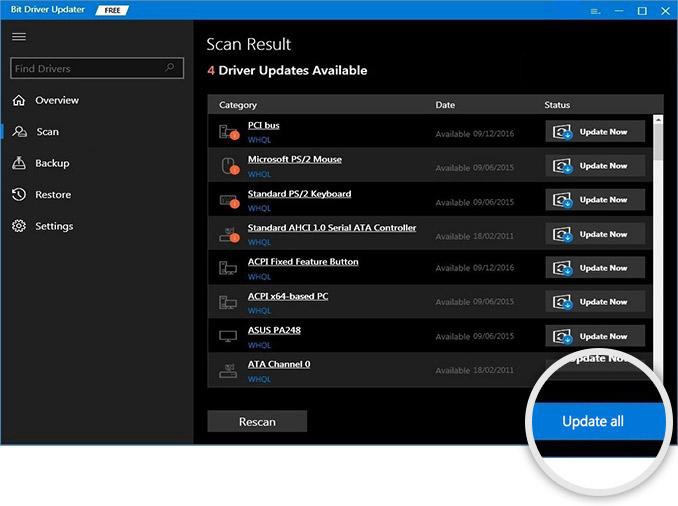
If you want to update just the Realtek audio driver, choose the Update Now option in front of it. However, in order to ensure exceptional computer performance, we recommend updating all of the drivers.
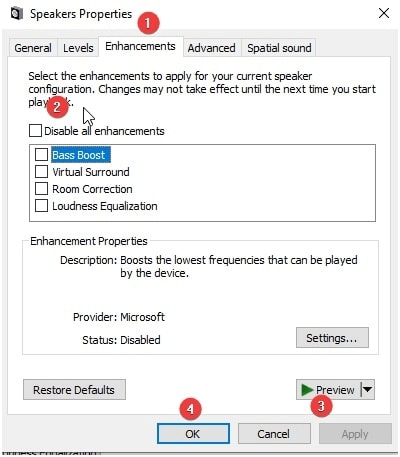
Solution 3: Turn off Audio Enhancements
Realtek audio may experience problems due to interference from audio enhancement improvements, such as Realtek audio not working on Windows 11/10. It is therefore preferable to turn off audio enhancements. Detailed instructions for doing it are provided below.
- Right-click the volume icon in the system tray.
- Click the sound settings button.
- Then click Additional Device Properties from the Device Properties menu.
- Navigate to the Enhancements tab and select the Disable all enhancements checkbox.
- Click Apply, then OK.
Also know: AMD High Definition Audio Device Drivers Download for Windows PC
Solution 4: Turn off the Microsoft UAA Bus Driver.
Two high-quality drivers running simultaneously on a PC may experience conflict. Therefore, if Windows 10’s Realtek audio driver is not working, consider deactivating the Microsoft UAA Bus Driver. Here are the steps to complete it.
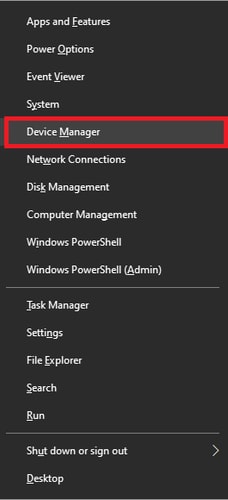
- To open Device Manager, search for it.
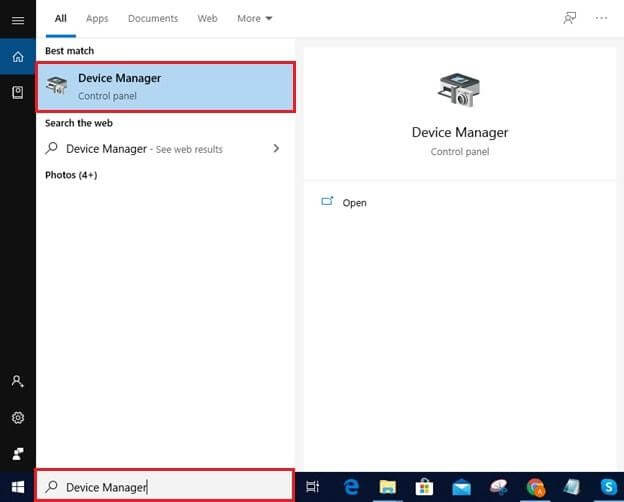
- To access them, locate System Devices and double-click on them.
- Select Disable device from the options where you right-click on the Microsoft UAA Bus driver.

- Now, your computer needs to restart.
- Play some music to see if the Realtek audio driver not working problem has been resolved or if it is still present.
Solution 5: Choose the Right Output Device
The incorrect audio output setting may also be the root of the Windows 10 Realtek audio issue. As a result, you can choose the appropriate output device to solve the issue. Here is the procedure to do so.
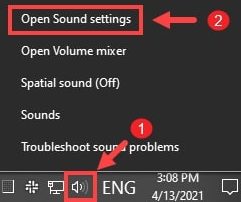
- In the system tray, right-click the volume icon.
- Select the option for open sound settings.
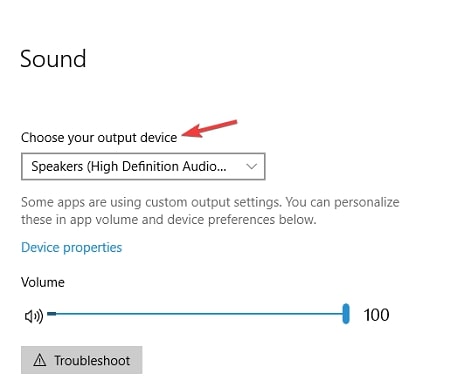
- Choose Speakers or Headphones as your output device.
- Check to see if the problem has been resolved or if Realtek audio is still not working.
Solution 6: Change the Default Sound Format
Realtek audio is not working on Windows 10 or 11 problem may be due to your current sound format. Therefore, to resolve the problem, you should alter the default format of the sound. Here are the steps to do so.
- To access the sound settings, right-click on the sound option.
- Select Additional device properties under Device Properties.
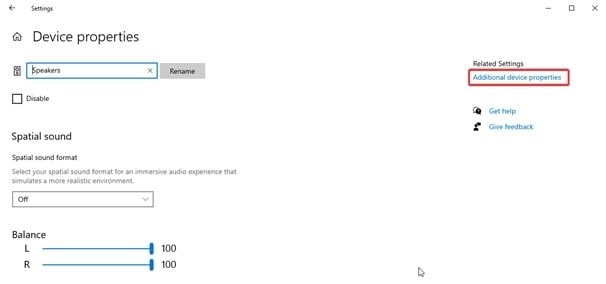
- Navigate to the Advanced option.
- Depending on how the speaker is set up, select 24-bit/192000 Hz or 24-bit/44100 Hz by clicking the down arrow.
- After selecting Apply, click OK.
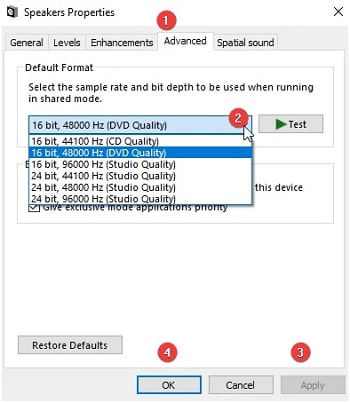
- Check to see if the aforementioned steps have fixed the Windows 10 Realtek audio not working issue or if it still exists.
Also know: Beats Audio Driver Download, Install, and Update for Windows PC
Solution 7: Reinstall the audio driver
Realtek audio not working problems in Windows 10/11 can also be due to incorrectly installed or poorly configured audio drivers. In order to fix the issue, you can remove and reinstall the audio driver. Please follow the steps below.
- Start your computer’s Device Manager program.
- Double-click the Audio inputs and outputs.
- Select Uninstall device from the drop-down list of options by right-clicking on the audio driver.
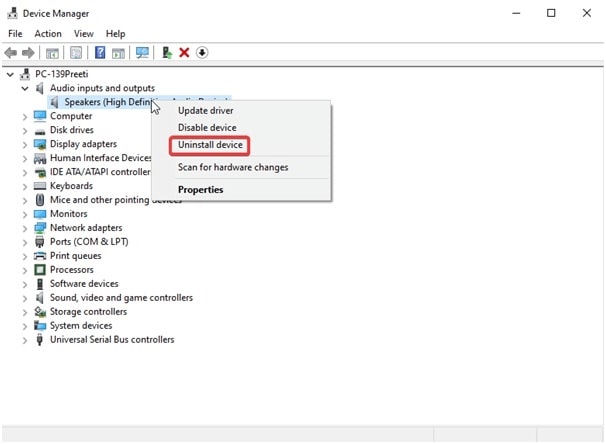
- Select Uninstall/OK after removing the device’s driver software.
- In the Device Manager, choose Action, then check for hardware changes.
- Restarting the computer will bring the procedure for reinstalling drivers to a finish.
- Check to see if the Realtek audio not working problem on Windows 11/10 has been resolved after following the above-mentioned instructions.
Solution 8: Start the Windows audio service again
The Realtek audio not working issue on Windows 10/11 may be a result of an incorrectly configured or disabled Windows audio service. So, restarting it or turning it on might fix the issue. Through these methods, you can restart or turn on the Windows audio service.
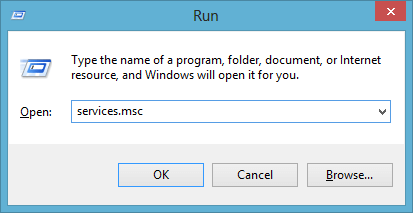
- By pressing Windows + R on your keyboard, you can open the Run window.
- To open the Services window, type services.msc into the box that appears on the screen and press OK.
- Right-click the Windows Audio service.
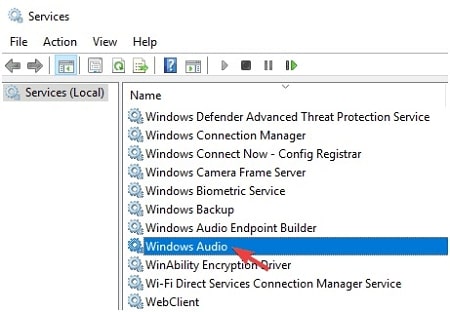
- Select Properties from the context menu.
- Set the Startup setting to Automatic by going to the menu. If Windows Audio is already set to start automatically, you must restart the service by right-clicking on it and choosing Restart from the menu that appears.
- Click Start, Apply, and OK.
- To see if Realtek audio is functioning or not, try playing some sound.
Solution 9: Check the Wireless Connection and Audio Cable
If the Realtek Audio Console Not Working issue is not resolved with the help of the aforementioned menus, you should next examine the physical connections of all your audio equipment.
Ensure that all of the audio (and power) wires are securely connected to both the device and your computer. In order to ensure there aren’t any loose connections, it is a good idea to disconnect or unplug them and then rejoin everything. Make sure the audio cables are plugged into the appropriate ports. The green connector, which occasionally features a headphone symbol, is generally where audio output devices must be plugged in.
Any cable that is frayed, overbent, or otherwise damaged might not be usable. It might need to be adjusted to achieve a solid connection. It is ideal to replace any worn-out cables.
Go to Settings > Devices > Bluetooth & Other Devices to confirm that any wireless audio devices, such as headphones, are properly paired with your computer.
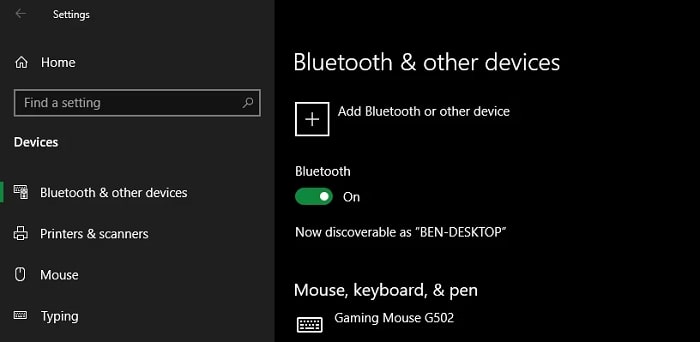
Disconnect those Bluetooth headsets from any other devices you may be using, such as your smartphone, tablet, smart TV, or other similar ones, before attempting to re-connect to your Windows computer. If your Bluetooth headphones are paired with your phone right now, trying to play music from your laptop to those headphones won’t work.
In case another device is interfering, consider unplugging all audio connections from your computer except the one you intend to use.
Frequently Asked Questions
Q1. How do I fix Realtek’s no sound?
By setting the speakers to default, you can resolve the Realtek no-sound issue. To accomplish this, take the following steps:
- Launch the Run window by pressing Windows + R.
- Type mmsys.cpl and hit enter.
- Select the Playback tab, then, from the context menu, click Speakers. Next, click Set as Default Device.
- Close the Sound Settings window and restart the computer.
Now check, and you should not experience an audio problem. If that does not work, use the Bit Driver Updater to automatically update the Realtek Audio driver. It is the most efficient way to resolve the Realtek no-sound issue.
Q2. How do I get my sound back on Windows 10?
To get the sound back on your computer and resolve Realtek audio driver problems, install a generic audio driver.
- Choose Device Manager by right-clicking the Windows Start icon.
- Double-click Audio Inputs and Outputs from the menu.
- From the list, choose Update Driver by right-clicking the Realtek audio device.
- Select the second option, “Browse my computer for driver software.”
- Click the option that reads, “Let me choose from a list of available drivers on my computer.”
- From the list, choose the High Definition Audio driver, then follow the on-screen prompts.
However, if you find this process complex, you can use Bit Driver Updater, a driver updating tool, to update corrupt and problematic drivers.
Q3. How do I fix a corrupted Realtek driver?
Reinstalling and updating the driver is the simplest method for repairing a corrupt Realtek driver. To update corrupt and problematic drivers, you can either do it manually using Device Manager or use Bit Driver Updater, which is an excellent tool for updating drivers.
Solved: Realtek Audio Driver Not Working
This detailed guide will help you resolve the Realtek audio not working in Windows 11/10 problem. To find the best solution, you can try the fixes described in this post one at a time.
However, you can use Bit Driver Updater to instantly update out-of-date drivers if you want to save energy and time. Consequently, you can give it a try. Last but not least, if there are any comments or queries about this article, please do not hesitate to contact us.
Recommended :
Snehil Masih is a professional technical writer. He is passionate about new & emerging technology and he keeps abreast with the latest technology trends. When not writing, Snehil is likely to be found listening to music, painting, traveling, or simply excavating into his favourite cuisines.


![How to Update and Reinstall Keyboard Drivers on Windows 10/11 [A Guide]](https://wpcontent.totheverge.com/totheverge/wp-content/uploads/2023/06/05062841/How-to-Update-and-Re-install-Keyyboard-Drivers-on-Windows-10.jpg)
