
If a single image is not enough, a scrolling screenshot has the ability to capture an entire website or webpage. In this article, you’ll learn some of the most effective and simple ways to take a full-page or scrolling screenshot on Windows 11/10.
There are multiple methods to capture a screenshot on Windows 10. The most straightforward and common way to capture a screenshot is with the Windows key + PRT screen. But this technique only captures what is contained in the screen’s dimensions. But what happens if you wish to take a scrolling screenshot on a Windows PC that contains text, images, or any other data that is outside the visible area of a document or webpage? How to take a scrolling screenshot on Windows 10/11?
This article covers some of the best free tools to capture Windows scrolling screenshots. So let’s get into it.
How to Take Scrolling Screenshot In Windows 10 & 11
Taking a scrolling screenshot on Windows 11/10 is important when you want to capture a web page, document, or Word file in one single screenshot. But how to take a long screenshot on a laptop or desktop?
Don’t worry! You can capture scrolling screenshots on Windows 10/11 using some of the browser extensions and third-party desktop programs. In this guide, we’ll cover all you need to know about how to take a scrolling screenshot on Windows 11/10. Let’s begin.
1. Capturing Scrolling Screenshots in Edge
The built-in feature of Microsoft Edge, the default Windows web browser, allows you to take a scrolling screenshot of an entire web page or website.
To do this, choose “Web Capture” and “Capture Full Page” from the three-dot menu in Edge’s upper right corner. If you select the three dots in the upper right corner of the image, you can draw on them, edit them, save them, copy them, or instantly share them.
2. Taking a Scrolling Screenshot in Mozilla Firefox
Since the release of Firefox Quantum, the browser has come equipped with an internal mechanism for taking scrolling screenshots. Which makes it the only one that can do so without the use of plugins. So let’s examine how to take scrolling screenshots on Windows 10 with Firefox.
- Select “More tools > Customize Toolbar” from the menu option with three lines located in the upper right-hand corner.
- Then, locate the “Screenshot” tab in the list of icons and drag it onto the toolbar of Firefox.
- Afterward, go to the page where you would like to screenshot and select “Save Full Page” from the Toolbar’s fresh screenshot icon.
- The complete page will appear and can be saved to your computer.
Here’s how to take a long screenshot in Firefox on Windows 10.
Also know: How To Screenshot On Dell Laptop Windows PC
3. GoFullPage (Microsoft Edge and Chrome)
You can get an Edge or Chrome extension that will enable you to take screenshots as you scroll through content (Edge supports the exact same Chrome extensions that Google Chrome does). It is a great way to quickly capture a scrolling screenshot on Windows 11/10.
- Press the GoFullPage button in the browser’s upper right corner after installing the extension. If it does not appear right away, select GoFullPage from the list of extensions by selecting the icon with the puzzle pieces. Click the “Pin” button to keep it in your browser’s toolbar.)
- After clicking GoFullPage, the whole page you’re currently on will be scanned. The screenshot is available for editing, annotation, and download as a PNG or PDF file.
4. PicPick
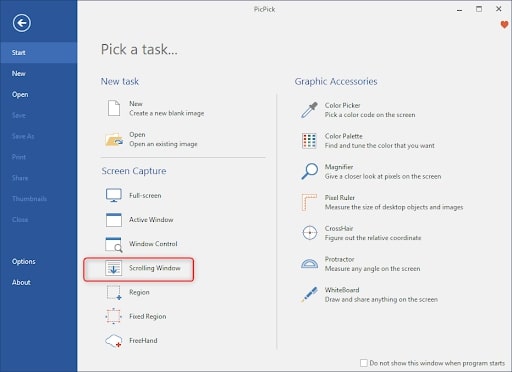
PicPick stands out as one of the top apps for taking Windows scrolling screenshots. The program is free, lightweight, and one of the best Snipping Tool alternatives. So, adhere to the instructions below to learn how to take scrolling screenshots using ShareX in Windows 10:
- Once you have downloaded the software to your desktop or laptop, install it. The initial run will ask you to alter the hotkeys. Choose “Yes” and “OK” on the following screen. If the program fails to register the hotkeys, click “Cancel”.
- Hit Ctrl, Alt, and PrntScrn at the same time to open the page you want to use as the starting point for your scrolling snapshot. The “Capture Scrolling Window” popup window will display.
- When you eventually click on the selected screen, the window will continue to scroll to take a snapshot of the entire page. The program will display the captured screenshot in its built-in picture editor and present a variety of modification options once it reaches the bottom.
- Choose “File” in the upper-left portion of the screen to get to the “Save” options after editing is complete. The snapshot is now prepared to save in the format of your choice.
With the simple, free program PicPick, you can take screenshots of scrolling text by pressing a specific hotkey. Additionally, it has a number of editing and saving options, making it fairly flexible.
Also know: How to Fix Snip and Sketch Not Working on Windows PC
‘ShareX’ is a well-known software that enables you to take a scrolling screenshot on Windows. In addition to the scrolling screenshot feature, it has built-in annotation tools for screenshots and screen recording options.
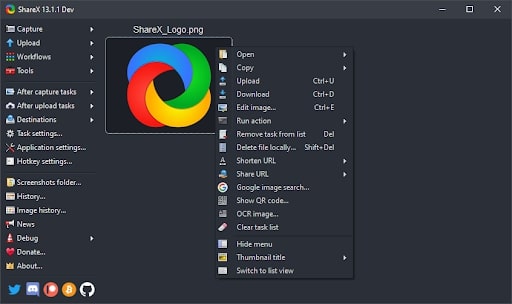
It is free and open-source donationware. You may also reorder text in your snapshot, add effects and watermarks, and do much more. Follow these instructions to learn how to take scrolling screenshots in Windows with ShareX:
- Go to the website you wish to capture a Windows scrolling screenshot of first. Afterward, open ShareX.
- With the target webpage in the background, click “Capture” in the ShareX window’s upper-left corner. Next, choose “Scrolling Capture” from the slide-out Capture menu.
- After that, scroll the screenshot by moving the mouse pointer over the target window and clicking on it. A new ShareX window with more options will appear when you do that.
- On the second window, click “Start Capture.” the target window will instantly begin to scroll.
Note: Before clicking “Start Capture” on the second window, minimize the primary ShareX window. This is crucial because the first window will block your screenshot if you don’t. However, you shouldn’t be concerned about the second window. It will automatically minimize.
- The option to upload it to the cloud or save it locally will be presented to you at the end. ‘Upload/save depending on after-capture parameters’ should be used.
- The screenshot will now be available for various actions, including annotating, copying, printing, and uploading.
A feature-rich alternative to PicPick and Snagit, ShareX has many tools for editing, annotating, saving, and uploading screenshots. In addition, ShareX allows you to edit screenshots (scrolling or not) in third-party apps, just like several other apps in this category.
Additionally, it includes various features that, although intimidating at first to new users, are rather effortless to use once you get used to them. Overall, it is among the best Windows tools for taking screenshots of scrolling web pages.
6. Snagit
Snagit is yet another top-notch tool for taking scrolling screenshots on Windows 11/10. You can capture screenshots of the entire desktop, just a section of the screen, or just the open app windows using the advanced software’s screenshot feature. Additionally, it offers a scrolling snapshot feature that lets you capture full web pages as screenshots.
It allows you to take a photo of an entire webpage or a scrolling window. It is compatible with every current browser version, including Edge, Chrome, Opera, and Firefox. Therefore, read on to discover how to use Snagit to capture scrolling images on Windows 10. The steps are as follows:
- To capture a scrolling screenshot towards the left, launch Snagit and choose the “Image” tab. From the “Selection” drop-down menu, select “Scrolling Window” at this point.
- Following that, turn on both options in the Scrolling Window settings (gear icon). Finally, make sure the desired window is visible and press the red “Capture” button to get a scrolling screenshot of the window.
- Snagit will automatically scroll the content while taking a screenshot of the complete open window. After the snapshot has been processed, the program also gives you the option to save, annotate, or upload it to cloud storage.
- If you are someone who frequently takes scrolling screenshots, you may create a “Preset” [1] with the same parameters and configure hotkeys [2] to speed up the process.
Snagit is a premium app, and it is quite expensive. However, it is among the simplest programs for taking scrolling screenshots. If you’re a technical YouTuber looking for a strong screenshot tool, this is likely your best bet.
Conclusion
As you can see, although the scrolling screenshot feature is not natively supported in Windows 10/11, you can use free extensions, software, and add-ons to learn how to take a scrolling screenshot on Windows to get the job done.
Hence, capturing full-page screenshots on Windows 10 is quite easy, thanks to the abundance of third-party software available for the purpose. If you thought the information shared was helpful, bookmark this page and share it with others.
Snehil Masih is a professional technical writer. He is passionate about new & emerging technology and he keeps abreast with the latest technology trends. When not writing, Snehil is likely to be found listening to music, painting, traveling, or simply excavating into his favourite cuisines.


![How to Update and Reinstall Keyboard Drivers on Windows 10/11 [A Guide]](https://wpcontent.totheverge.com/totheverge/wp-content/uploads/2023/06/05062841/How-to-Update-and-Re-install-Keyyboard-Drivers-on-Windows-10.jpg)
