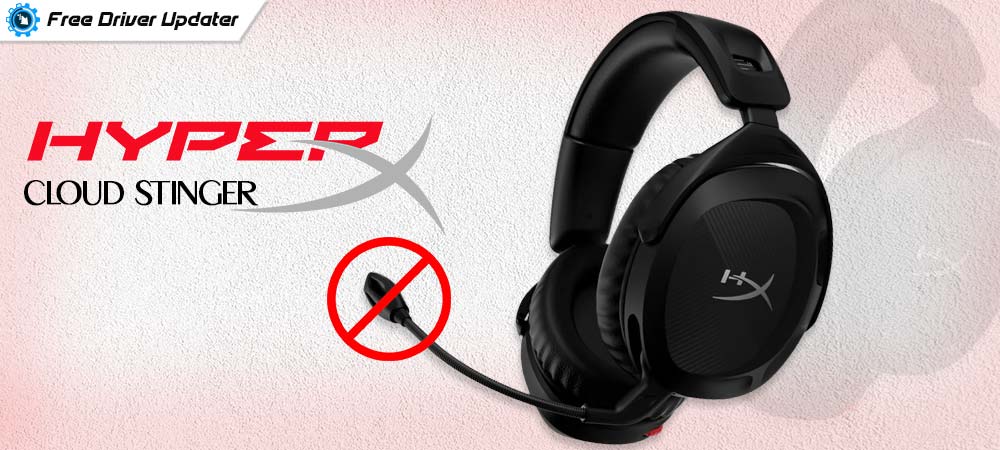
Are you facing the HyperX Cloud Stinger microphone not working issue on your Windows 10/11 device? If yes, then this article will provide you with different methods to get rid of this issue.
If you are a gamer, you should know how important it is to have high-quality audio and sound in the games. HyperX’s new Cloud Stinger headset is designed to provide users with the best sound experience while playing games. Although this is one of the best gaming headsets on the market, many users reported that their HyperX Cloud Stinger mic not working properly.
If you are one of these users, then there is nothing to worry about, we got you covered. Today, in this article we will share some of the most efficient ways through which you can resolve the HyperX Cloud mic not working problem. So without wasting any more time, let’s check out the solutions.
Different Ways To Fix The HyperX Cloud Stinger Microphone Not Working Issue
Below are different solutions with some directory steps to help you fix the HyperX Cloud Stinger mic not working easily.
Fix1: Fix HyperX Cloud Stinger Microphone Not Working By Checking The Connection
The first thing to cure the problem is to check your connections. Many times, because of damaged hardware, you might end up with a HyperX Cloud Stinger mic not working. Check to see if the microphone’s body has any cracks or if the cord has any cuts. If there are any problems, take the headset to a repair shop or buy a new one.
Also, try unplugging and then re-plugging the microphone cable into the computer’s microphone port. It’s possible that you’re not inserting the cable in the right way.
Below we have shared some ways to test if the microphone is working properly or not. These steps will also help you in fixing the HyperX Cloud mic not working issue.
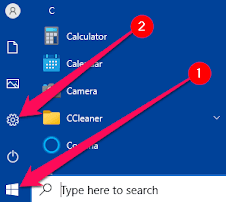
- Click on the Start menu and open the Settings program from the app drawer
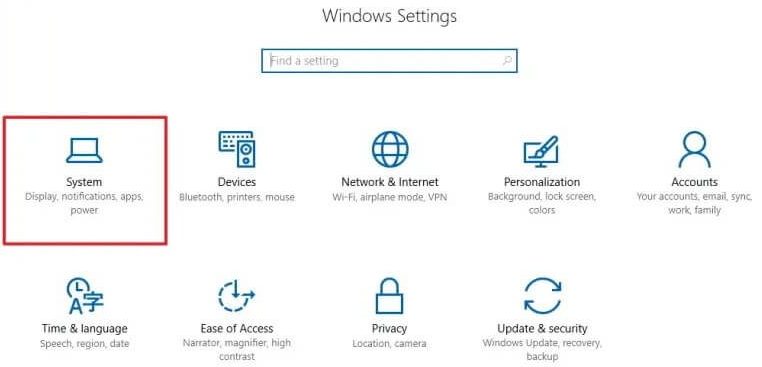
- On the Settings window, go to the System settings
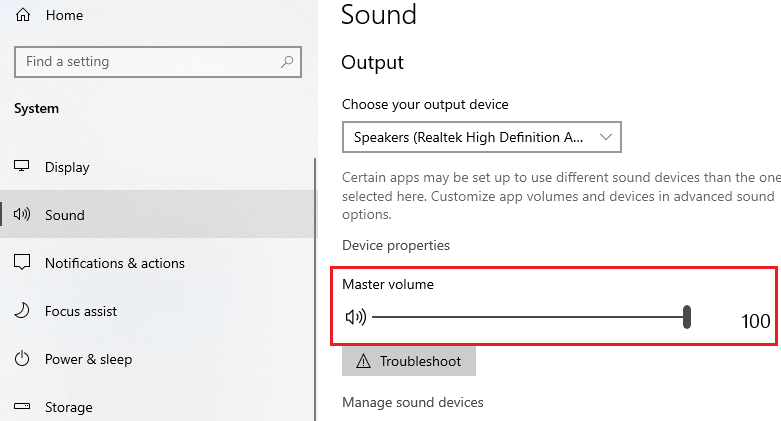
- Select the Sound tab from the left-side panel. Then, on the right-hand side under the “Input” heading, click on the dropdown menu and select the HyperX Cloud Stinger mic.
- Now, slide the “Master Volume” slider to max (100).
Once you have completed the process, close the settings window and check if the HyperX Cloud Stinger mic not working issue is resolved or not. If not, then move to the next solution.
Also Read: HyperX Mouse Driver Download And Update For Windows
Fix2: Give Access To Resolve HyperX Cloud Stinger Microphone Not Working
If everything is properly plugged in and still you are facing the HyperX Cloud Stinger mic not working issue while connected to your PC, there is a good chance that your computer is not recognizing the mic. This is because the system might be using a different microphone as the default.
You can change the HyperX microphone settings and give access to your mic. Below are some instructions that will help you change the default mic settings in order to fix the issue.
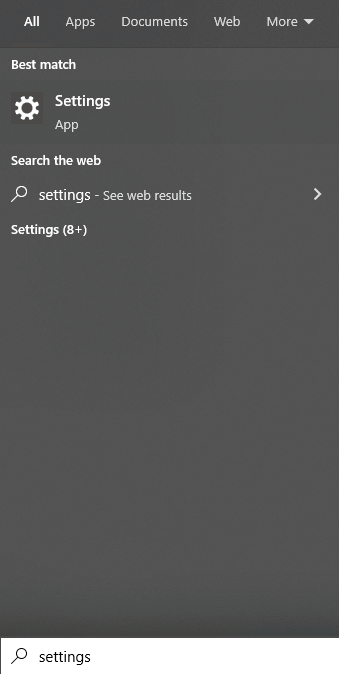
- Search Settings in the taskbar and then hit the Enter key on your keyboard
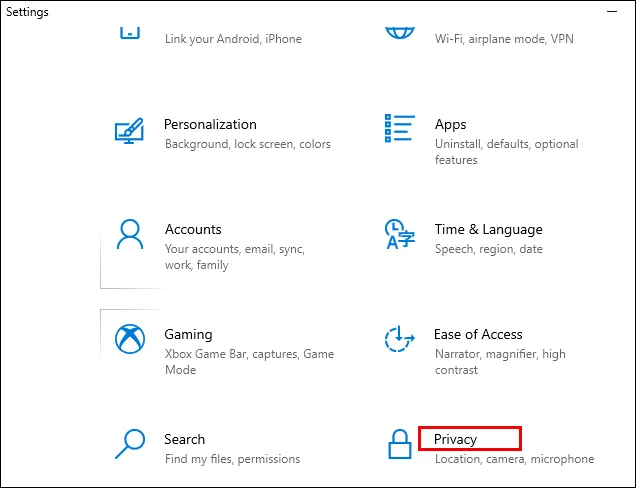
- On the Settings window, go to the Privacy settings by clicking on it.
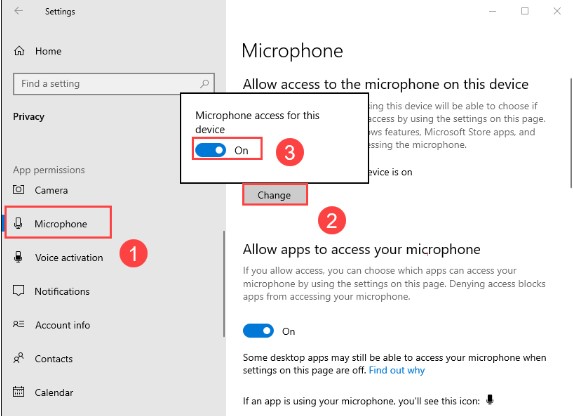
- Now, select the Microphone tab present on the left-hand side panel. Then, on the right side, click on the Change button and Turn ON the toggle switch.
- Again, Turn ON the toggle switch under the “Allow apps to access your microphone” heading. This will allow all the applications to access the HyperX Cloud Stinger microphone.
After giving access, see if the HyperX Cloud Stinger mic not working issue is resolved. If not, then you should try updating the Windows operating system.
Fix3: Update Windows And Get Rid Of the HyperX Cloud Stinger Microphone Not Working
Sometimes, not having the latest Windows OS might mess up the connected devices. Hence, it is necessary to always keep your Windows updated to avoid glitches, bugs, or errors like the HyperX Cloud Stinger mic not working.
You can perform the updation process from the Windows settings menu. Moreover, with the help of the steps mentioned below, you will be able to use and update your Windows OS easily.
- Type Settings in the taskbar’s search bar and then hit the Enter key on your keyboard.

- On the Settings window, go to the Update & Security settings by clicking on its icon.
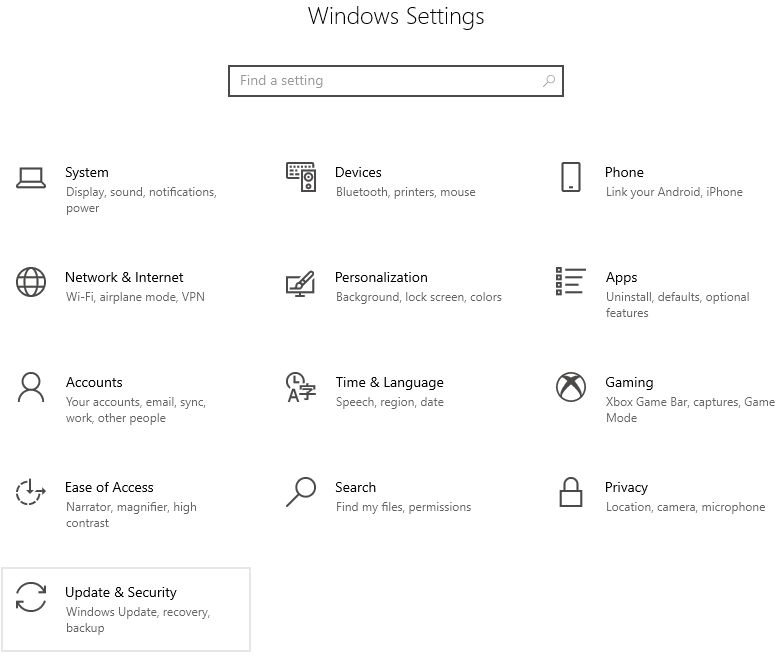
- Now, select the Windows Update tab from the left-hand side panel. Then, on the right-side panel, click on the Check for updates button.
- Wait for some time till your computer searches for the latest OS version available online. Then, click on the Download and install button and it will start the process.
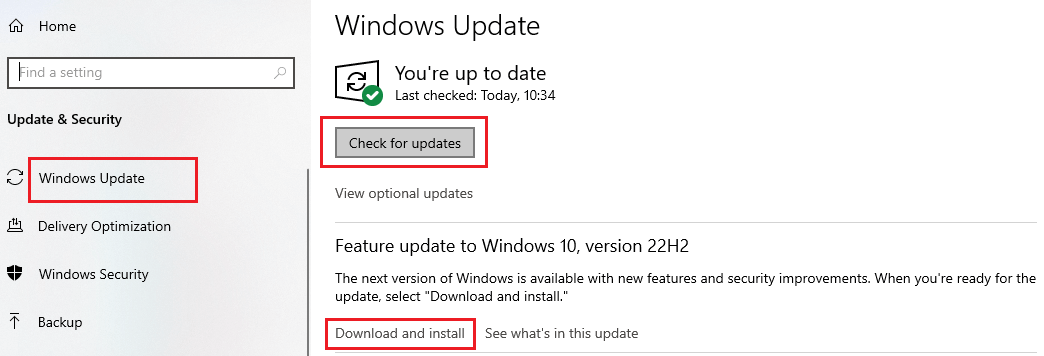
After downloading the new Windows, restart your computer and it will install the new OS on its own. Check if performing this process has helped you solve the problem. If not, then it is time to update your HyperX Cloud Stinger drivers.
Also Read: How to Reinstall and Update Audio Sound Drivers on Windows PC
Fix4: Update The HyperX Cloud Stinger Drivers
Keeping your Windows drivers updated will help your computer improve compatibility with connected devices and fix issues like the HyperX Cloud 2 mic not working. It will also help your device to enhance its overall performance.
There are various methods through which you can update the drivers on your PC. Today, we are going to talk about the easiest, most reliable, and safest way to update HyperX Cloud Stinger drivers.
This is an automatic process in which you need to download and install the best driver updater software. There are thousands of such software available online but we would recommend you go with the Bit Driver Updater app. This app is specially made for Windows devices and is trusted by thousands of users. Some additional advantages of using the Bit Driver Update app on your PC are:
- Allows you to schedule the driver download process
- Can be used as a computer performance enhancer
- Creates a backup of old drivers
- Provides 24*7 customer assistance
- Improves the compatibility and connectivity between computers and devices
Steps To Update HyperX Cloud Stinger Drivers Using Bit Driver Updater:
As you have looked at the advantages of having this application on your computer. Now, it’s time to check out the steps to download, install, and use the app and fix the HyperX Cloud Stinger mic not working.
- Click on the link below and download the latest version of the Bit Driver Updater application

- Once the application has been downloaded, search File Explorer in the taskbar and press the Enter key.
- On the File Explorer window, open the Download folder and run the downloaded file. Now, follow the steps displayed on your screen to install it.
- Open the Bit Driver Updater app by double-clicking on its icon.
- Now, click on the Scan Drivers button present in the middle of the page. This will allow the application to search for outdated audio drivers.
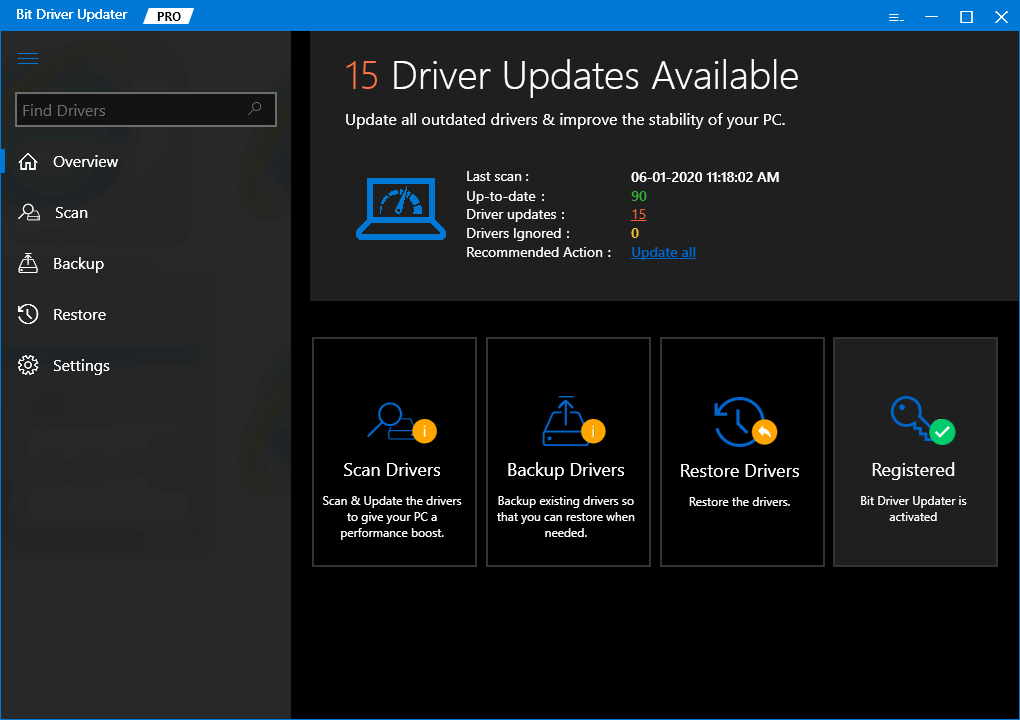
- Then, you can click on the Update All button and it will update all the drivers one by one.
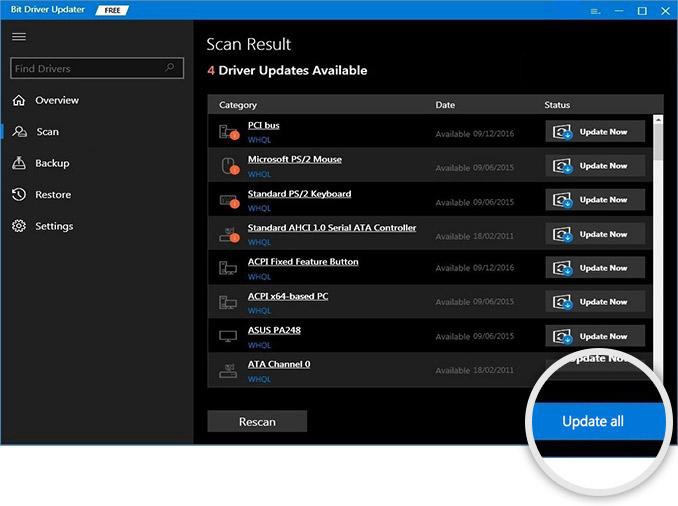
After getting the new HyperX driver, Reboot your computer and it will automatically install and fix the HyperX Cloud Stinger microphone not working.
Fix5: Run The Windows Troubleshooter To Resolve HyperX Cloud Stinger Microphone Not Working
If you are one of the users who are still facing the microphone not working Windows, then you can try performing the troubleshooting process. For this method, you need to take help from one of the Windows-integrated utilities called the Troubleshooter.
You can easily access this tool from Windows Settings and it will find and fix the issue for you. Below are some steps that will help you use Windows Troubleshooter in order to get rid of the HyperX Cloud Stinger mic not working.
- Type Settings in the taskbar’s search bar and then press the Enter key on your keyboard
- On the Settings window, click on the Update & Security option
- Now, select the Windows troubleshooter tab present on the left-side panel. Then, under the “Recommended troubleshooters” heading on the right-side panel, click on the Additional troubleshooter button.
- Under the Find and fix other problems heading, click on the Speech option to expand it. Then, click on the “Run the Troubleshooter” button and it will start the process.
When the process is finished, Restart your computer and it will solve your HyperX Cloud Stinger microphone not working issue.
Solved: HyperX Cloud Stinger Microphone Not Working On Windows 10/11 Devices
We hope the above-mentioned solutions have helped you fix the HyperX Cloud Stinger microphone not working problem. If the issue is still bothering you, there is a major chance that your microphone is physically damaged. In this case, either take it to a repair shop for some professional opinion or purchase a new one. Moreover, share your thoughts regarding this write-up in the comments box below.
Snehil Masih is a professional technical writer. He is passionate about new & emerging technology and he keeps abreast with the latest technology trends. When not writing, Snehil is likely to be found listening to music, painting, traveling, or simply excavating into his favourite cuisines.




![How to Update and Reinstall Keyboard Drivers on Windows 10/11 [A Guide]](https://wpcontent.totheverge.com/totheverge/wp-content/uploads/2023/06/05062841/How-to-Update-and-Re-install-Keyyboard-Drivers-on-Windows-10.jpg)
