If you have bought a new HyperX mouse for your device. Then read this article to download the HyperX mouse driver for your Windows 10/11 computer.
HyperX is a popular gaming hardware company that includes peripherals, headsets, SSDs, and memories. But many recently reported encountering problems with HyperX in Windows 10. It works with all Windows devices starting from Windows 7 to the latest Windows 11 operating system.
If you are using a HyperX mouse on your computer, you should update the HyperX mouse driver for Windows 10/11 on a regular basis. It is easy to get the updated Mouse driver for the HyperX mouse and install them. All you have to do is read this article guide carefully and follow the instructions properly.
Different Ways For HyperX Mouse Driver Download And Update
If you want to use the HyperX mouse on your Windows device, then you will need to download or update your HyperX device driver. In order to make sure that you have the ultimate performance, this company keeps all its product drivers updated on its official website. Below are three different methods with explanatory steps to help you with the HyperX mouse driver download or update.
Method1: HyperX Mouse Driver Download From Official Website
As we have discussed earlier, Hypermax often updates the drivers for its gaming products. Follow the steps below to download the most up-to-date HyperX mouse driver for Windows 10/11 from the official website. Step1:
- Click on this link and visit the HyperX official website: Click Here
- Scroll down a bit and there you will see a Download button present in the middle of the window. Click on that button in order to start the HyperX mouse driver downloading process.

- Once it is downloaded, right-click on the Start menu and select the File Explorer option from the list.
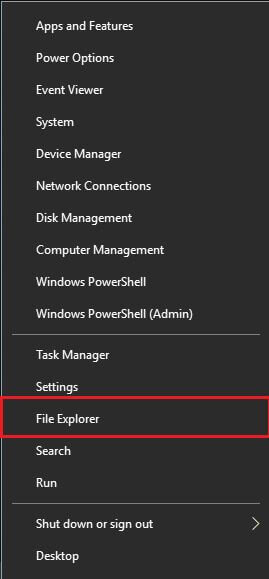
- Then, choose the Downloads folder present on the left-hand side panel.

- On the downloads folder, look for the HyperX Ngenuity setup file and run it.
- Follow the on-screen instructions shown by your computer to install the HyperX mouse driver on your Windows 10/11 device.
- Now, Restart your system and your computer will automatically implement the new mouse drivers for you.
If your Windows Store is acting weird or if you have already downloaded the drivers. And if you need to update the HyperX mouse drivers, then the next method is for you.
Also read: Mouse Scroll Wheel Not Working on Windows 10? Here’s How To Fix It!
Method2: HyperX Mouse Driver Using Device Manager
Windows operating system comes with an in-built tool called the Device Manager. This tool’s main purpose is to allow Windows users to keep their missing, corrupted, and outdated drivers updated at all times. You can update all the device drivers using the Device Manager utility including the HyperX mouse driver for Windows 10/11. Below are some steps that will walk you through the process.
- Type Control Panel in the taskbar’s search bar and then press the Enter key on your keyboard
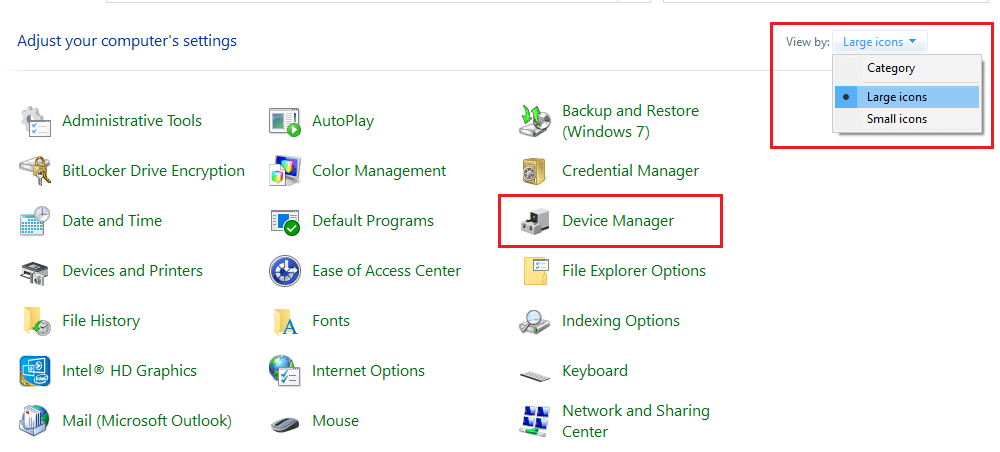
- On the Control Panel window, click on the “View by” dropdown menu and select the Large icons option from the context list.
- This will change the icon’s design and then you need to click on the Device Manager tool, in order for the HyperX mouse driver update.
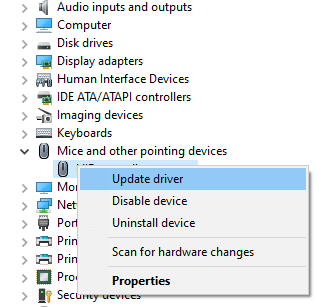
- Double-click on the “Mice and other pointing devices” device and it will expand showing different mice connected to it over time.
- Right-click on the HyperX mouse driver and select the Update driver option from the list
- A new pop-up window will appear, choose the “Search automatically for drivers” option
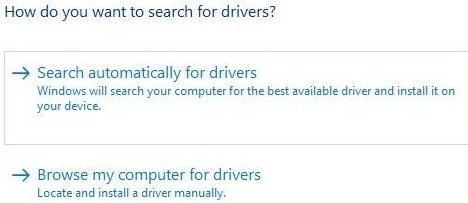
- Now your computer will search for new drivers. And then it will show you some steps to install the HyperX mouse driver, so follow the on-screen instructions.
- After the completion of the process, Restart your computer and it will replace the old drivers with the new ones.
Method3: Use The Automatic Process For HyperX Mouse Driver Update And Download
In this method, all you need to do is download the best and the most reliable driver updater software like the Bit Driver Updater. This amazing software comes packed with various tools and features to make your job easier. Some of these features are:
- It allows you to schedule the update process for drivers
- Let’s you update all the drivers at once with just a click
- Helps your computer increase its processing speed
- Comes with a user-friendly interface
Below are some instructions to guide you through the download and installation process, so follow them carefully.
- Download the Bit Driver Updater software by clicking on this link:

- Once the app is downloaded, go to the downloads folder and launch the setup file. Then, follow the on-screen instructions to complete the installation process.
- Open the app and you will see the Scan Driver button in front of you, click on it. This will allow the app to start scanning for outdated and missing drivers.
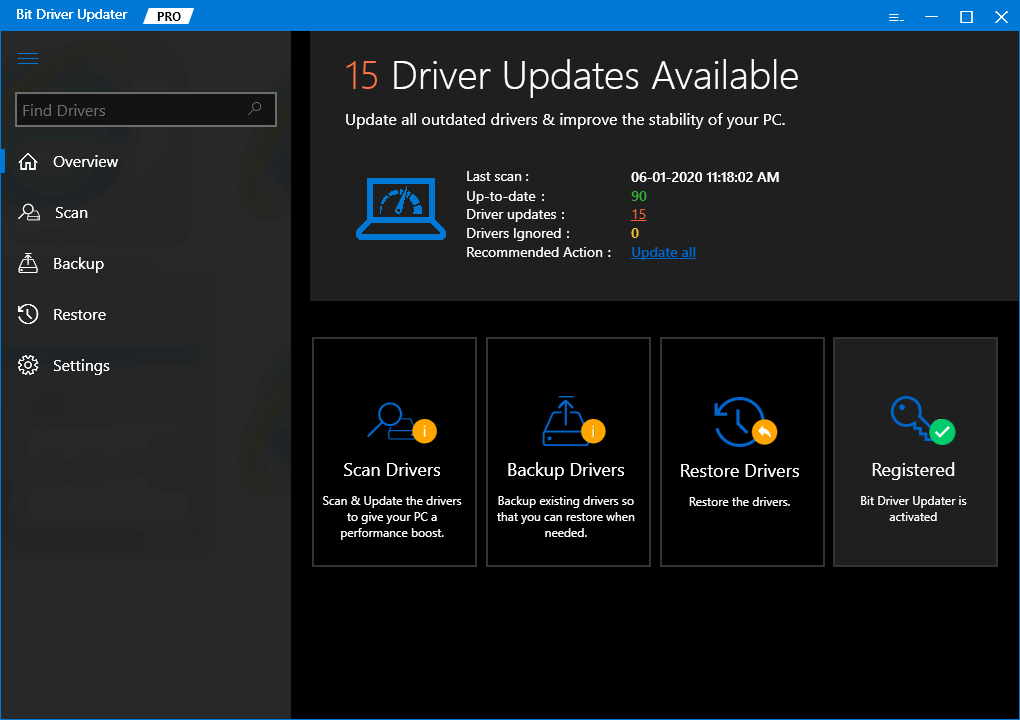
- After the scanning process, it will show you all the drivers that you can update or download. Now it’s up to you whether you want to update only the HyperX mouse driver or you want to update them all.
- You can click on the Update Now button to update drivers one by one. Or else, click on the Update all button to update all at once.
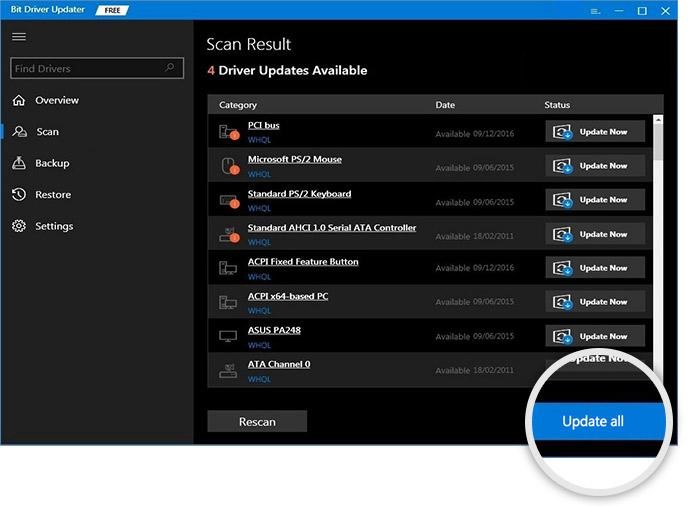
- When the process is done, Reboot your system and all the drivers will get updated.
Conclusion
Above we have elucidated three effective and efficient methods of how to update or download the HyperX mouse driver for Windows 7, 8, and 10. You can follow any of them to obtain the correct and updated driver version. If you have any suggestions or questions regarding this driver download guide then share them in the comment box below, we would love to hear from you. You can also subscribe to the Bit Driver Updater blog for more download guides like this.
Snehil Masih is a professional technical writer. He is passionate about new & emerging technology and he keeps abreast with the latest technology trends. When not writing, Snehil is likely to be found listening to music, painting, traveling, or simply excavating into his favourite cuisines.



![How to Update and Reinstall Keyboard Drivers on Windows 10/11 [A Guide]](https://wpcontent.totheverge.com/totheverge/wp-content/uploads/2023/06/05062841/How-to-Update-and-Re-install-Keyyboard-Drivers-on-Windows-10.jpg)
