
Is your Mac running low on storage space? Well, you belong to the 80% of Mac users who have the same problem. We all had a ton of storage space on our Macs earlier when they had hard drives, but today’s SSDs in our Macs have a smaller storage capacity. Which makes it more difficult to store vital data like high-resolution video and images.
Running out of storage can seriously slow down the performance of your Mac and interfere with your work. In the worst-case scenario, if you don’t get rid of some of the items occupying space on your Mac, you might even find yourself unable to boot it up one day since the startup disk is full! You shouldn’t disregard any warnings that your startup disk is almost full if you have already seen them.
Furthermore, if you’re running an operating system update, you might also need to free up some space on your Mac. So it’s essential to understand how to free up space on Mac, regardless of whether you are using a brand-new or older model. We’ll show you a few efficient ways on how to clear up space on Mac below. But before that, let’s find out what’s taking up space on your Mac.
How To Check and Manage Storage on a Mac
We understand that you are anxious to learn the best advice on how to free up space on Mac. But before we begin, you must first understand how to check your available storage and determine what is using up the space on your Mac. After that, you can use the tips that apply to you the most to free up space.
So, here’s how you can check the storage space on your Mac:
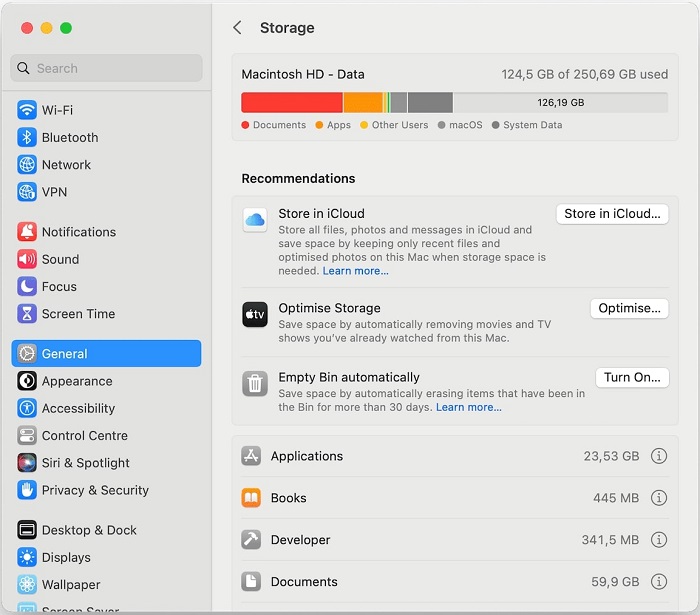
- Navigate to the System Settings > General > Storage tab in the main Apple menu.
- Alternately, select Apple Menu > About This Mac > More Info > Storage Settings.
You can see a summary of your used and available storage space in the colorful graph. To see how much space each category takes up, simply move your pointer over the various colors. The free, open storage space is indicated by the light gray color.
Now that you have a general idea of what uses up the space on your Mac hard drive, it is time to find out how to clear space on your Mac.
How To Free Up Space on Mac
Though it can be a laborious process, clearing out space on your Mac is necessary to maintain the speed and efficiency of your machine. So, We’ve compiled some of the best advice on how to free up space on Mac both manually and automatically. Continue reading to find out!
1. Empty the Trash
You might not be aware that macOS doesn’t always delete objects from the Trash. There’s a possibility that you have a few GB of data lying around. To empty your trash, right-click the trash symbol in your Dock and choose Empty Trash. You won’t have access to the data once it has been wiped out. Go to Finder > Preferences > Advanced and check Remove items from the Trash after 30 days to automatically clear the Trash on a regular basis. This is our first and most basic advice on how to free up space on Mac.
Read Also: Best PC Cleaning Software
2. Remove Previous iOS Backups and Old iTunes Files
To know how to clear space on Mac, you need to learn that the backups of your iOS device on your Mac could occupy terabytes of storage. Select the iOS Files tab in the Storage Management window. Click on the iOS device backup and select Delete when you are sure that you want to remove it.
Similar to this, you can remove data stored in the iTunes application from the iTunes area if you’ve got an old Mac. Here, you’ll find films, TV series, and audiobooks. You’ll find separate categories on the latest Macs for stuff like podcasts and audio files.
3. Find and Delete Large Files
The next approach how to free up space on Mac is to delete the large files. To do so, Click on the Documents option in the sidebar of the Storage Management window. All of your files are listed here, arranged from largest to smallest. Getting rid of a few large files is the easiest way to recover a significant amount of storage space. It takes considerably longer to sort through numerous files. Click the Delete button after selecting a file to remove it.
To free up local storage, you can transfer the file to your cloud storage if your Google Drive or Dropbox account has room for it. It’s time to dive in once the large files are out of the way. MacOS makes this easier. Two other ways to browse files are Downloads and File Browser, which are located above the Documents view.
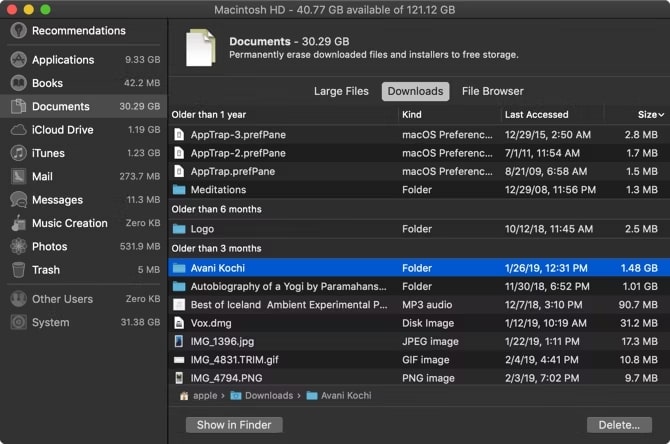
You can view a breakdown of the files and folders that are more than three, six, or one year old in the Downloads section. So you can review files you haven’t opened in a while and determine whether you want to delete them. The storage management tool’s File Browser feature is essentially a Finder view. You can search across your whole file storage system to find the files or folders you want to delete.
Read Also: Best RAM Cleaner, Optimizer, and Booster
4. Utilize Built-in Tools to Optimize Storage
You always have the option of adding more storage space, regardless of how much you have available. Apple has created storage management solutions after realizing this basic truth. Open the Apple menu, select System Settings > General > Storage, and then click to access them.
You may view the items taking up space on your hard disk here, grouped into various categories. To access storage management settings, click the “i” icon next to each category.

5. Upload files to the cloud.
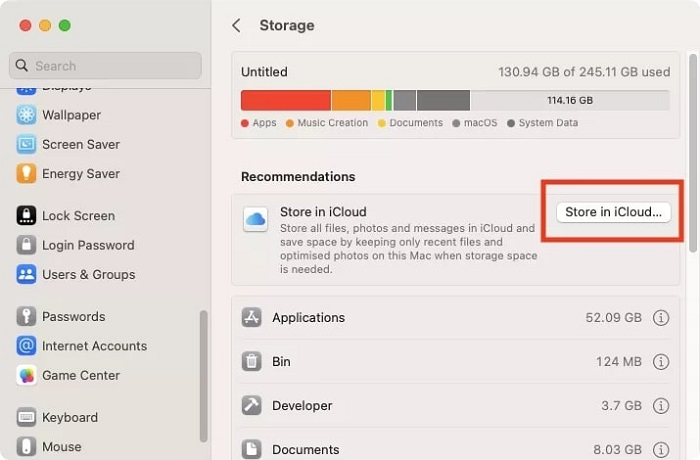
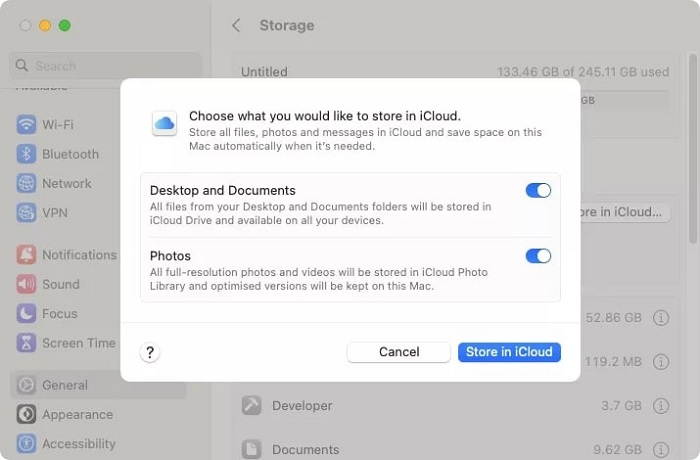
Making use of the cloud is a practical way to free up space on your Mac. Due to its integration with macOS and free 5GB of online storage, Apple’s own iCloud program is a suitable choice. You can expand it as much as you need if you purchase a subscription. Here’s how to utilize iCloud to free up space on your Mac’s hard drive:
- Select System Settings by clicking the Apple symbol in your menu bar.
- Select General from the sidebar, then click Storage.
- Then select Store in iCloud.
- Ensure that Desktop, Documents, and Photos are all selected, then choose Store in iCloud. There you go. Now, these files will be uploaded to iCloud automatically on your Mac in order to free up space.
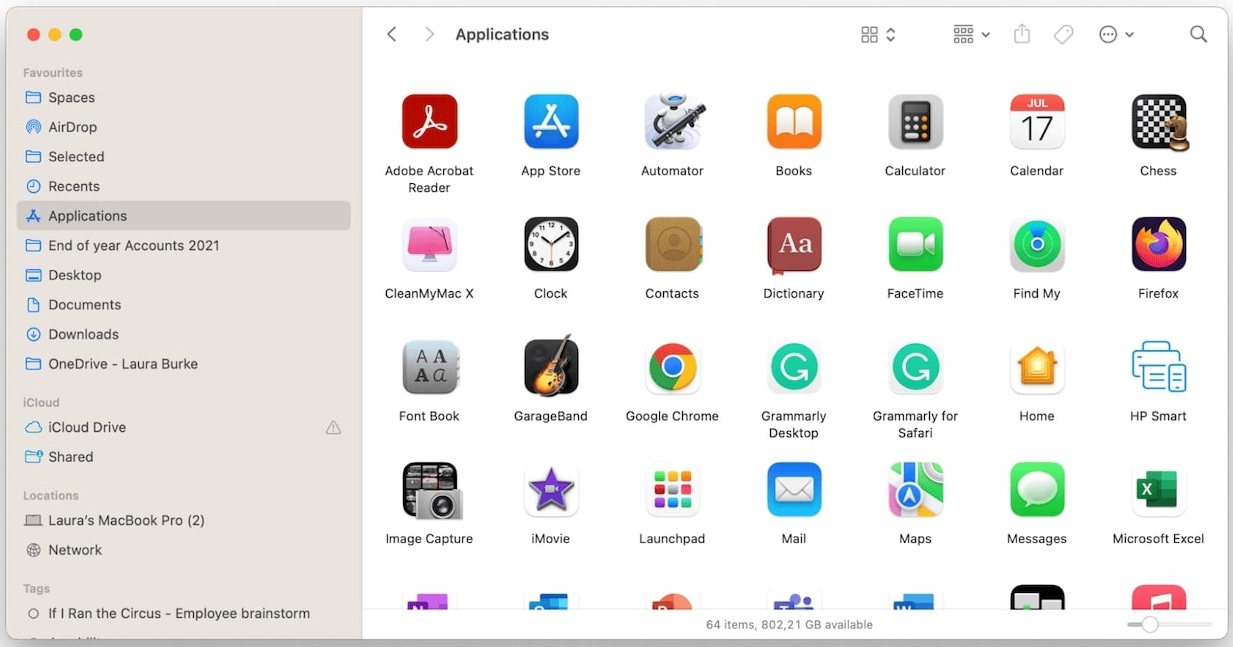
6. Remove Applications That Are Never Used.
Another quick and simple tip on how to make space on Mac is to uninstall any programs you no longer use. The following is one of the easiest methods for manually removing programs, together with all their associated temporary data and hidden leftover data.
- Open a Finder window, then look in the sidebar for Applications.
- Drag the app you wish to delete from here to your Trash or Bin.
- Finally, empty the trash.
There is a common misconception that if you delete an app, it is permanently gone. This procedure does not guarantee that every trace of the application has been removed from your device. Leftovers from hidden apps will remain on the Mac, and it is exactly this type of digital junk that consumes space. So, how to find app leftovers and get rid of them to free up a few GB of space? Here’s how you can do it:
- When a new Finder window appears, select Go from the top menu while holding down the Option key.
- Go to the list and choose Library.
- Enter the name of the app you just deleted in the search field at the top right of the screen. Select the Library folder to make sure your device searches in the right place.
- Find all the relevant files, then drag them to your Trash, then empty them.
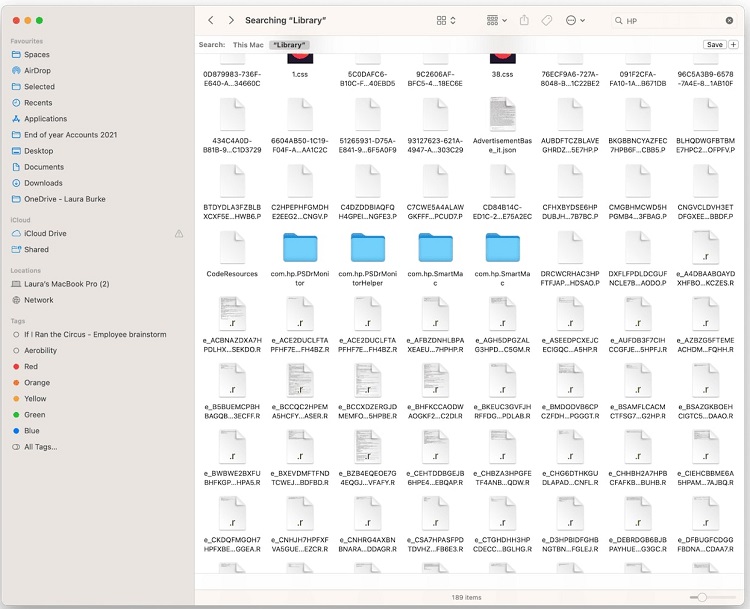
By doing this, you can be sure that every last app has been deleted from your device, significantly freeing up disk space.
Read Also: Best Game Booster Apps
7. Locate and Remove Duplicate Files
Another suggestion on how to free up space on Mac is to find every duplicate folder and file. It’s likely that over time, you downloaded the same thing more than once without realizing it or accidentally made copies of documents.
It might be a challenging procedure that calls for some patience, but since unnecessary duplicates eat up space, it’s important to find and get rid of them. Starting with the simple task of deleting duplicate music and video files:
- Launch the Music app.
- Choose File > Library from the main menu.
- Click the Option key and select Show Exact Duplicate Items.
If there are any duplicates, you can easily remove them by selecting them from a list.
Unfortunately, it’s not so easy and takes some time to do for all other file formats, but let’s take a closer look at how to achieve it:
- Open Finder, then select File > New Smart Folder from the top menu.
- Click the “+” button in the top right corner.
- Select Kind in the first dropdown box. then choose your file type in the next one.
- Select List View at this point and arrange your files by name so that you can quickly identify duplicate files.
- Simply drop duplicates in your trash or recycle bin when you locate them.
Depending on the different file types you wish to search for, you may have to perform this procedure several times. It’s important to make sure that the duplicates you’re deleting using this method are actually duplicates by looking at the Date Created column.
Although the manual cleanup techniques are efficient, doing them repeatedly takes time. And if you are a Mac power user, you might have to do it on a monthly basis. Fortunately, there are several Mac Cleaning software tools that can help streamline some of these procedures and automate Mac’s regular maintenance.
Final Takeaway
Now that you have learned how to free up space on Mac and must have cleared out some space on it, it will give you better performance in return. You can now restart your Mac to get a fresh start and enjoy your lightweight Mac. You should no longer be concerned about running out of disk space if you occasionally follow these instructions on how to clear up space on your Mac.
Snehil Masih is a professional technical writer. He is passionate about new & emerging technology and he keeps abreast with the latest technology trends. When not writing, Snehil is likely to be found listening to music, painting, traveling, or simply excavating into his favourite cuisines.


![How to Update and Reinstall Keyboard Drivers on Windows 10/11 [A Guide]](https://wpcontent.totheverge.com/totheverge/wp-content/uploads/2023/06/05062841/How-to-Update-and-Re-install-Keyyboard-Drivers-on-Windows-10.jpg)
