This article is a full-fledged guide on how to fix mouse lagging in Windows 11 operating system PCs. The best ways to fix this problem are given below.
Windows 11 is the latest version of the Windows operating system. Microsoft has tried its best to provide users with a better experience while working with the latest version. However many users have reported some issues with the operating system.
The most common issue faced by them is mouse lagging in Windows 11 PC. If you are also experiencing the same problem, here you will find the best fixes. One can easily find and fix mouse problems with the help of fixes explained in the article below.
List of the Best Ways To Fix Mouse Lagging and Stuttering Issue In Windows 11
The following list contains the most effective ways to fix wireless mouse lagging issues in Windows 11 operating system PC. Try applying all the fixes and find out the best one by yourself.
1. Disable Mouse Trails on Your PC
The first way to fix mouse lagging in Windows 11 is by disabling the mouse trails on the PC. The proper steps to disable mouse trails are as follows:-
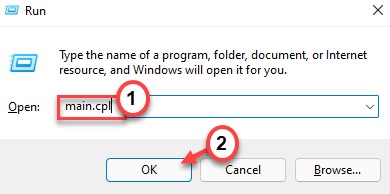
- Launch the Windows Run box by pressing the Win + R key combination.
- Type main.cpl and click on the Ok button.
- Now go to the Pointer Options tab and search for the Visibility section.
- Uncheck the box that says Display pointer trails.
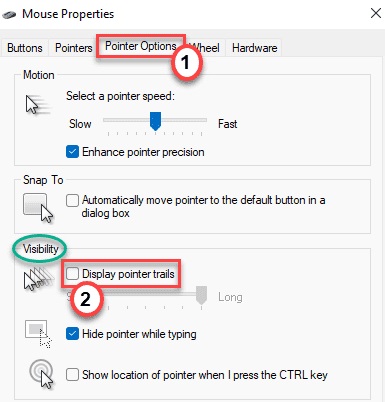
- Lastly, click on the Apply button and then on the Ok button.

These settings will disable mouse trails and will fix Mouse Lagging and Stuttering Issues on Windows 11.
2. Try Disconnecting and Reconnecting The Mouse
When using a wireless mouse you can try disconnecting and reconnecting the mouse to fix wireless mouse lagging issues. Follow the steps below for this purpose:-
- Go to the settings of Windows PC and visit the Bluetooth & devices settings.
- Click on the three dots beside the USB mouse connected.
- Now click on the Remove device option.
- Lastly, reconnect the USB mouse device again to the PC.
Many users have found this simple fix very effective in resolving the problem of mouse lagging in Windows 11. You can try other fixes as well if this doesn’t work on your PC.
Also Read: How To Download & Update HID-Compliant Mouse Driver for Windows 10
3. Disable Adaptive Sync Settings
The next way to fix this problem is by disabling the Adaptive sync settings on Windows 11 PC. The steps to disable this setting are mentioned below:-
- Click on the Windows search box and type NVIDIA Control Panel.
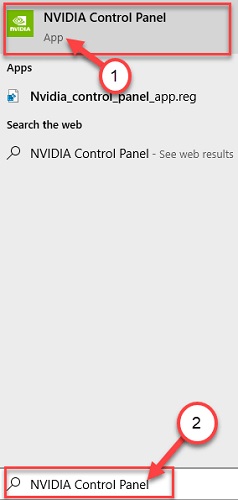
- Select the best match and on the new screen go to the Display tab.
- Click on Set up G-SYNC and uncheck the Enable G-SYNC box.
- Finally, restart your computer device.
If disabling the Adaptive sync settings does not fix Mouse Lagging and Stuttering issues. Then you are suggested to try the other solutions that are discussed below.
4. Reinstall The Mouse Drivers on PC
The software driver files for the mouse device are responsible for the proper functioning of the device on a Windows PC. If the driver files are corrupted or have become outdated. Then it is recommended to uninstall the problematic driver files and reinstall the same on your computer.
All Windows users are provided with a free driver updater tool which is the Bit Driver Updater tool. This tool is capable of fixing all the issues caused by the faulty driver in just one click.
The instructions to use and download the Bit Driver Updater tool are as follows:-
- Click on the download link below to get the tool on your computer.

- Correctly install the Bit Driver Updater tool and launch it.
- Press the Scan Driver button from the screen and wait until the process is finished.
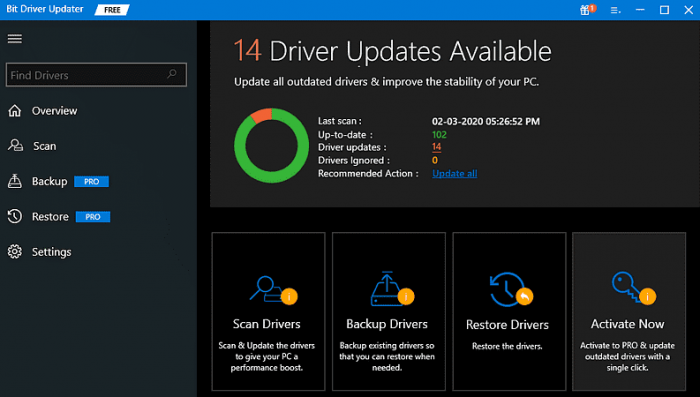
- Now update the mouse driver files by pressing the Update Now button, or else
- Press the Update all button from below to reinstall all the faulty and outdated driver files.

- Finally, restart the Windows 11 PC for the proper functioning of the newly updated driver files.
Once the latest version of the mouse driver is installed on your Windows 11 PC, the problem of mouse lagging in Windows 11 gets resolved automatically
5. Install All The Windows Updates
Installing all the available Windows updates is the solution to most of the issues faced by the users on their PCs. It is always advisable to keep the Windows operating system up to date.
Follow the steps below to install the Windows updates:-
- Head to the Windows settings by pressing the Win + I key combination.
- Click on the Windows Update button.
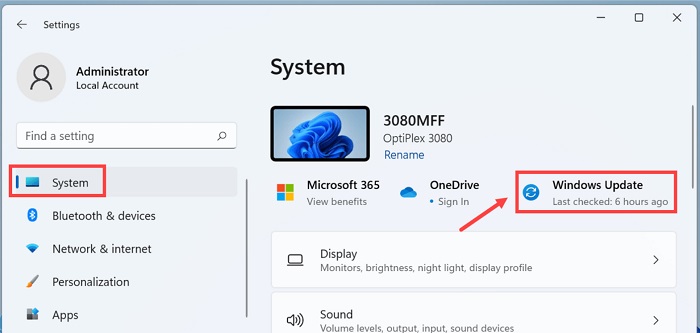
- After that press the button that says Check for updates.
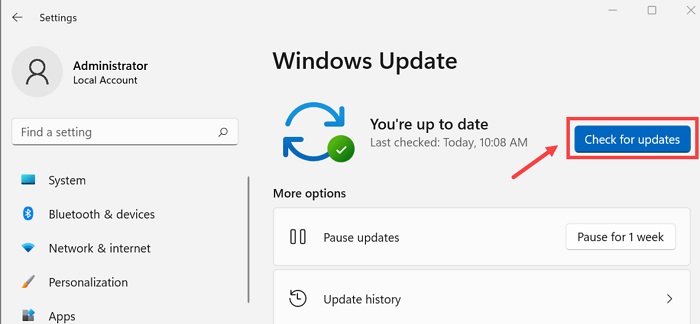
- Wait for the process to finish and the latest update will be installed on the PC.
- Finally, click on the Restart now button.
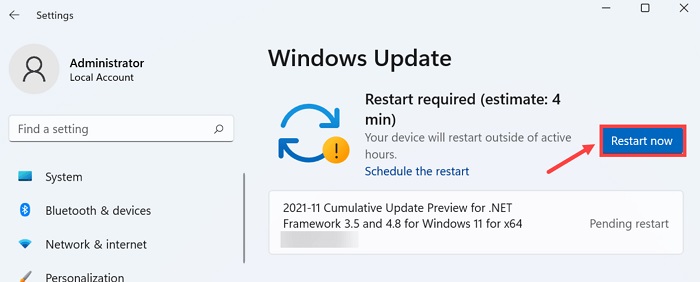
Soon after updating the version of the Windows operating system, the problem with the mouse device will be resolved on your PC.
Also Read: How to Download HP Mouse Driver for Windows 11/10/8/7
Final Words: How to Fix Mouse Lagging and Stuttering on Windows 11
Here we come to the end of this guide on how to fix mouse lagging in Windows 11 operating system PC. Some of the best fixes for this particular problem can be found in the above article.
Readers are provided with the facility of the comments section where they can ask their queries and share views on the concerned topic.
Snehil Masih is a professional technical writer. He is passionate about new & emerging technology and he keeps abreast with the latest technology trends. When not writing, Snehil is likely to be found listening to music, painting, traveling, or simply excavating into his favourite cuisines.




![How to Update and Reinstall Keyboard Drivers on Windows 10/11 [A Guide]](https://wpcontent.totheverge.com/totheverge/wp-content/uploads/2023/06/05062841/How-to-Update-and-Re-install-Keyyboard-Drivers-on-Windows-10.jpg)
