In the article below find the best methods to easily resolve the snipping tool not working on Windows 11, 10, or older version devices.
Snipping tools provide a handy platform to crop, capture and edit pictures on your Windows PC. Lately, a few users reported the issue of snipping tool not working on their Windows 11, 10, or other devices. Some also reported the problem of snipping tool not opening on their Windows device. But the problem can be addressed easily by applying the fixes mentioned in our article. Before we learn the solutions for Windows snipping tool not working, we must understand what can be the reason behind it.
Why Isn’t My Snipping Tool Working?
For your Windows device, the possibilities behind snipping tool not working can be many. But each of the problems has a specific fix that can resolve the issue and help you retain the normal working of snipping tool. Below are some of the commonly reported reasons by users that led to snipping tool not working Windows 11, 10, or older version devices.
- If the Graphics drivers installed on your device are incompatible or outdated it can hinder the working of the snipping tool.
- If multiple applications or programs are running on your Windows one of them might cause an interruption in the working of the snipping tool.
- The problem can be with the installation of the tool. Check if the file for the snipping tool is not corrupted.
- Check if the certificate for the snipping tool installed on your device is not expired.
Quick Fixes for Snipping Tool Not Working Windows 10, 11, 8, or 7:
Below are the set of fixes that can be applied on your Windows devices to fix snipping tool not working. Move down the list until the Windows 10 snipping tool not working issue is fixed.
FIX 1: Restart the Snipping App
If the snipping tool not opening on your device, the glitch can be with the shortcut of the app. Try restarting the app and checking if this fixes the error. Here’s how you can do it.
- Open the Task Manager on your device using the Ctrl, shift, and Esc keys altogether.
- Navigate to the Snipping tool app present under the Processes tab. Click on it and then press the End task option at the end of the window.
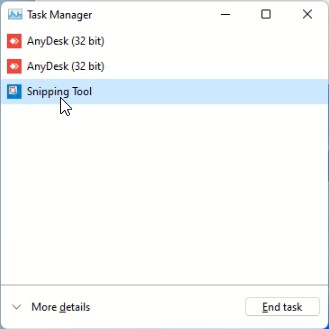 Relaunch the Snipping tool again and check if the Snipping tool not working issue is fixed.
If the problem is not fixed by restarting the tool, move to the next alternative fix.
Also Know: How to Take Scrolling Screenshots in Windows 11, 10
FIX 2: Reset App from Settings
If the Snipping tool not working Windows 7, 8, 10, or 11 try resetting the App for your device. Below are the simple steps that can be used to reset your snipping app and use it again without any interruptions.
- Use Windows and I keys together to open Windows Settings.
- Click on the Apps option to view the list of applications installed on your device.
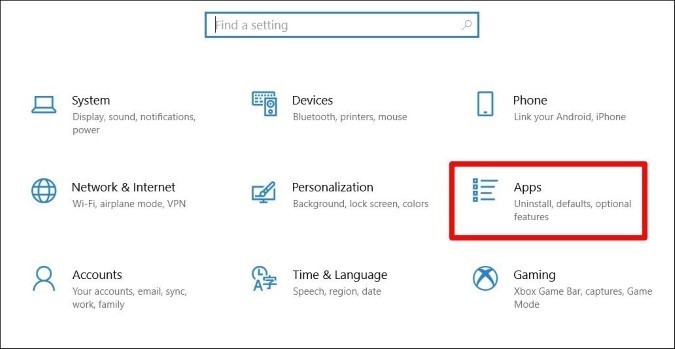 In the Apps and Features tab locate your Snipping app or tool and click on Advanced Options.
- Scroll down to find the Reset option that enables users to reset the app and deletes the current data of your App.
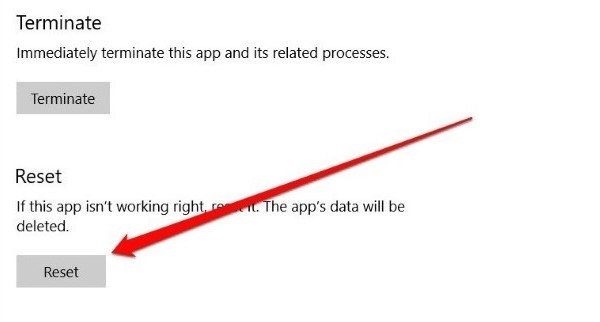 Once done, Restart your Windows device to apply the update. Open the App and check if the Windows snipping tool not working is fixed. If the issue remains, try the next set of methods.
FIX 3: Update Graphics Drivers
The incompatibility of driver software can lead to snipping tool not working issue. Download the latest build of your system’s Graphics driver manually from the device Manager or through an automatic driver updater software Bit Driver Updater.
Manually Update Drivers Through Device Manager
- In the search bar type Device Manager and open the App.
- Click on Display adapters to expand the section. Right click on your graphics driver and select Update Driver.
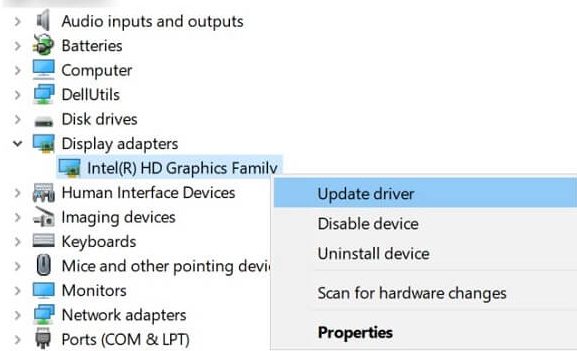 In the Next window click on the first arrow that indicates to automatically search for the recent driver.
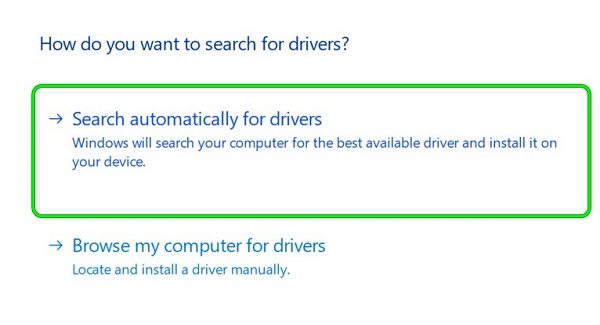 Install the latest Graphics driver by applying the instructions and Restart Windows to add the latest build of drivers.
Update Driver Automatically Through Bit Driver Updater
If you don’t have enough skills and patience to download the latest drivers manually download the Bit Driver Updater. It automatically updates drivers in no time. The tool is completely safe to use and provides reliable and certified drivers in addition to increasing the system performance. Moreover, you can schedule driver updates, and get 24*7 technical assistance and other features with the Pro version of the tool that is available with a 60 day money back policy.
Here is how you can use it to update Graphics Driver and fix snipping tool not working on your device.
- Launch the Bit Driver Updater as you finish downloading and installing it on your Windows PC.

- Click on the Scan Drivers option and hold on till the list of outdated drivers is displayed.
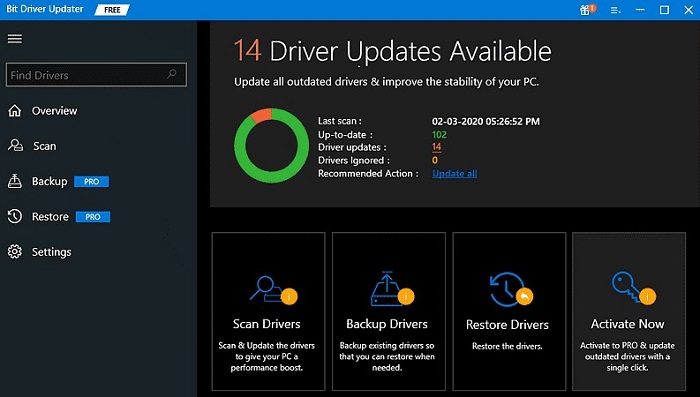 Click on Update Now button present next to your Graphics driver in the list displayed. If you have the Pro version of the tool click on the Update all option at the bottom of the list to download all the driver updates at once.
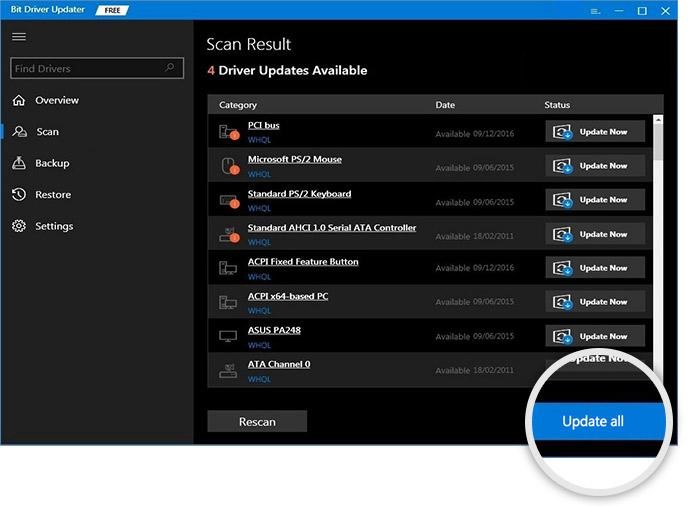 Install the downloaded file and Reboot your system to add the updated drivers.
Once the Graphics drivers are up to date, launch your snipping tool. Check if the snipping tool not working Windows 10 is fixed by the latest driver software.
If the drivers are not the issue and the snipping tool not working problem persists proceed to the further fix to troubleshoot the applications on your PC.
Also Know: How to Fix Snip and Sketch Not Working in Windows 10
FIX 4: Run Windows Store Apps Troubleshooter
If none of the methods mentioned above helped you fix snipping tool not working on your device, use the in built Windows troubleshooter for apps. To detect the problem with your snipping app and fix it use the following steps
- Click on the Windows and I keys on your keyboard to open the Settings App.
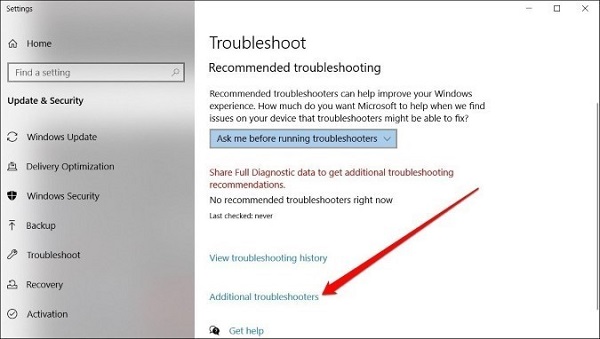
- Navigate to the Troubleshoot section and click on Additional Troubleshooters.
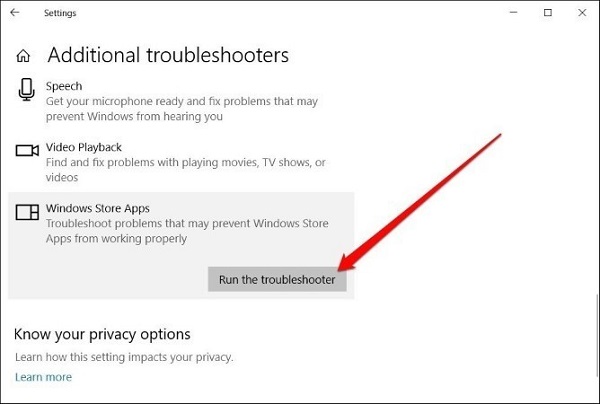
 In the Additional troubleshooters window scroll and find the option Windows Store Apps. Click on Run the Troubleshooter.
 Once the command completes its implementation Restart your Windows PC.
As the PC restarts Run your snipping tool. This will probably fix snipping tool not working Windows 10 issue on your device.
Snipping tool Not Working in Windows 11, 10, 8, or 7: FIXED
In the article above we have explained working solutions to fix Windows snipping tool not working. Apply the above fixes one at a time until the tool starts working fine again. Update the graphics Driver automatically on your Windows device through the Bit Driver Updater tool to resolve snipping tool not opening or working issues.
If you need any more information feel free to raise your query in the comment section. For more informative and technology updates subscribe to our blog to never miss an update. Follow us on our socials (Facebook, Instagram, Pinterest, and Twitter) to stay updated.
Snehil Masih is a professional technical writer. He is passionate about new & emerging technology and he keeps abreast with the latest technology trends. When not writing, Snehil is likely to be found listening to music, painting, traveling, or simply excavating into his favourite cuisines.

![Snipping-Tool-Not-Working-in-Windows-11,10,8,7-[FIXED]](https://wpcontent.totheverge.com/totheverge/wp-content/uploads/2022/05/26060837/Snipping-Tool-Not-Working-in-Windows-111087-FIXED.jpg)


![How to Update and Reinstall Keyboard Drivers on Windows 10/11 [A Guide]](https://wpcontent.totheverge.com/totheverge/wp-content/uploads/2023/06/05062841/How-to-Update-and-Re-install-Keyyboard-Drivers-on-Windows-10.jpg)
