
Transferring your PrestaShop store to a fresh server can seem like a tricky job, but if you take steps with patience, it won’t be that bad. You may have grown too big for the site hosting you have, come across a more appealing deal, or simply wish to be more in charge of your performance. No matter the cause, a proper move of your store prevents these problems from affecting your site and your buyers.
This guide walks you through the process step-by-step, in plain language, so you know exactly what to expect—and what to do—at each stage.
Preparing for the Server Transfer
Before diving into the move, some groundwork will save you time and trouble down the line.
Backup Your PrestaShop Store
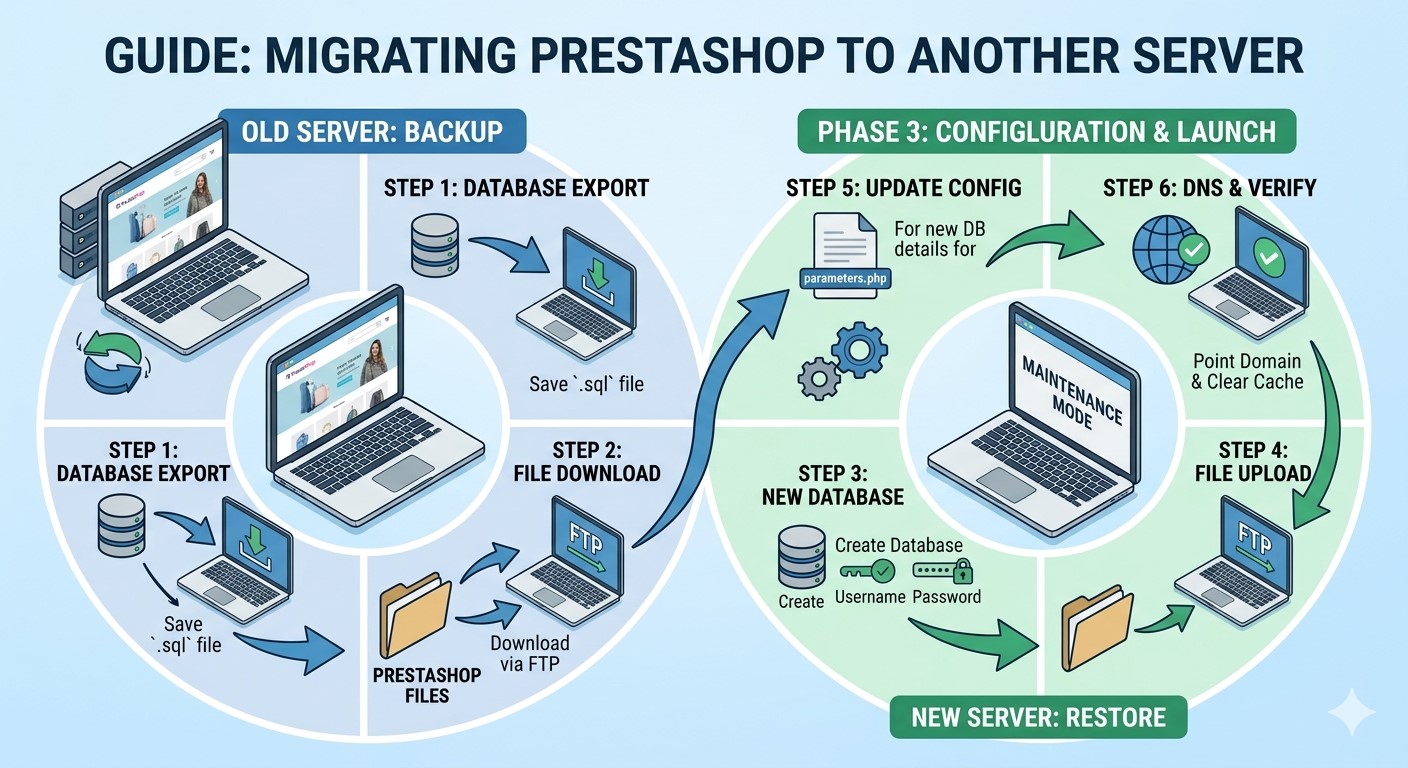
Let’s start with the obvious but often skipped step: backups. Back up everything. That means all your store files (themes, images, modules) and your database. Without both, your store won’t run. Most hosting dashboards offer tools to do this, or you can use FTP clients like FileZilla for files and phpMyAdmin for your database.
Think of it as your safety net. If anything goes wrong during the move, you’ve got a way back.
Check Hosting Requirements
Not all servers are created equal. PrestaShop has specific requirements—PHP version, MySQL support, and memory limits. Double-check that your new host meets them. If you’re not sure, most hosting providers list PrestaShop compatibility right on their product pages, or you can ask their support team directly.
Better to find out now than after everything’s already been uploaded.
Transferring PrestaShop Files and Database
With your prep work done, it’s time to move your actual store.
Export the Files
Use FTP (like FileZilla) or your hosting file manager to download your entire PrestaShop folder from the current server. This includes everything: themes, modules, product images, and more. Don’t cherry-pick—just grab the whole directory.
It can take a bit, depending on your store’s size, so be patient and make sure nothing’s skipped.
Export the Database
Next, open phpMyAdmin or a similar tool and export the database your PrestaShop store uses. Use the “Export” tab and select the “Quick” method with SQL format. This gives you a complete copy of your store’s data—products, customer info, order history, etc.
Be sure to save it somewhere you won’t accidentally delete.
Upload to New Server
The next step is to use FTP or the hosting file manager to upload all your store files to the new server. After the files are settled, import your old database into the new host’s database using phpMyAdmin (or a similar application). Make certain that no errors occur during the import. Should your new host have a different database name, user, or password, that won’t matter—we’ll configure it in step four.
Configuring PrestaShop on the New Server
At this point, your store is on the new server, but it’s not quite ready to run yet. A few tweaks will make everything click.
Update the Configuration File
Inside the config folder, open settings.inc.php. This file tells PrestaShop how to connect to the database. If the database name, user, or password is changed on the new server, update those lines accordingly.
If you’re unsure, your hosting provider should have given you these details when you set up the new database.
Adjust Domain and URL Settings
If you’re changing domain names—or if your site isn’t loading correctly—you may need to update the URLs in the database. Use phpMyAdmin to find the ps_shop_url table. Update the domain and domain_ssl fields to match your new domain, and adjust the physical_uri if needed.
If you can log into the PrestaShop back office on the new server, you can also change the shop URLs from there under Shop Parameters > Traffic & SEO.
Clear Cache and Regenerate .htaccess
After any big move, clear the cache to avoid loading outdated files. Go into the /var/cache folder inside your PrestaShop directory and delete its contents.
To regenerate your .htaccess file (which handles friendly URLs), log into the PrestaShop admin panel, go to SEO & URLs, and simply click “Save” at the bottom—no need to change anything. This forces PrestaShop to create a fresh .htaccess based on your current setup.
Test and Finalise the Migration
You’re almost there. A quick round of testing and cleanup will make sure your new setup is good to go.
Verify Functionality
Check that everything works as expected. That includes:
- Homepage and internal links
- Product pages and categories
- Add-to-cart and checkout process
- Admin panel login
- Modules and custom themes
If anything’s broken, double-check your file paths and database configuration.
Update DNS Settings
Last step: point your domain name to the new server. This usually means updating your DNS records (especially the A record) at your domain registrar. DNS changes can take a few hours to propagate fully, so don’t panic if the switch isn’t immediate.
During this time, it helps to avoid making store changes until everything settles.
Need Help with the Migration?
If all of this feels overwhelming, you’re not alone. Migration comes with its fair share of risks, especially if your store has a lot of customisations or traffic. If you’d rather leave it to someone who does this for a living, consider reaching out to a PrestaShop development company. They can make sure the move goes smoothly without any surprises or downtime.
Final Words
Setting up your PrestaShop store on a fresh server can feel challenging, except when you have the right plan in place. It’s important to move files and databases as well as to keep your store working well and safely in the new setup.
If you ensure your information is secure, your server is compatible, and your store is updated and tested, you will avoid frequent downtime, problems with your website, or trust issues with clients. Work through the process one step at a time, and don’t miss any of the finer points.
If you find the migration process difficult, then let a PrestaShop expert take care of it for you. Smartly transitioning your store process will help your business in the long run.
Our aim is to chase the future, innovations, and the latest trends of all things tech. We love to interact with industry experts, understand their diverse and unique perspectives, and spread their ideas.


![How to Update and Reinstall Keyboard Drivers on Windows 10/11 [A Guide]](https://wpcontent.totheverge.com/totheverge/wp-content/uploads/2023/06/05062841/How-to-Update-and-Re-install-Keyyboard-Drivers-on-Windows-10.jpg)
